Starlink Setup And Install Guide
I walk you through the installation process for the Gen 3 Standard Starlink kit. From unboxing to mounting, learn how to set up Starlink.
Starlink kit’s are designed for DIY installation, but if you’ve never done anything like this before, it can be intimidating. I’ve installed several Starlink systems over the years. In this guide, I’ll walk you through a typical Starlink installation so you know what to expect.
I’ll show you what comes in the kit, how to find a good mounting location, and how to hook everything up. I will also go over how to properly aim the dish. Finally, I’ve compiled some common questions at the end, which hopefully answer any lingering questions you may have after reading through this guide.
Starlink Kit Contents
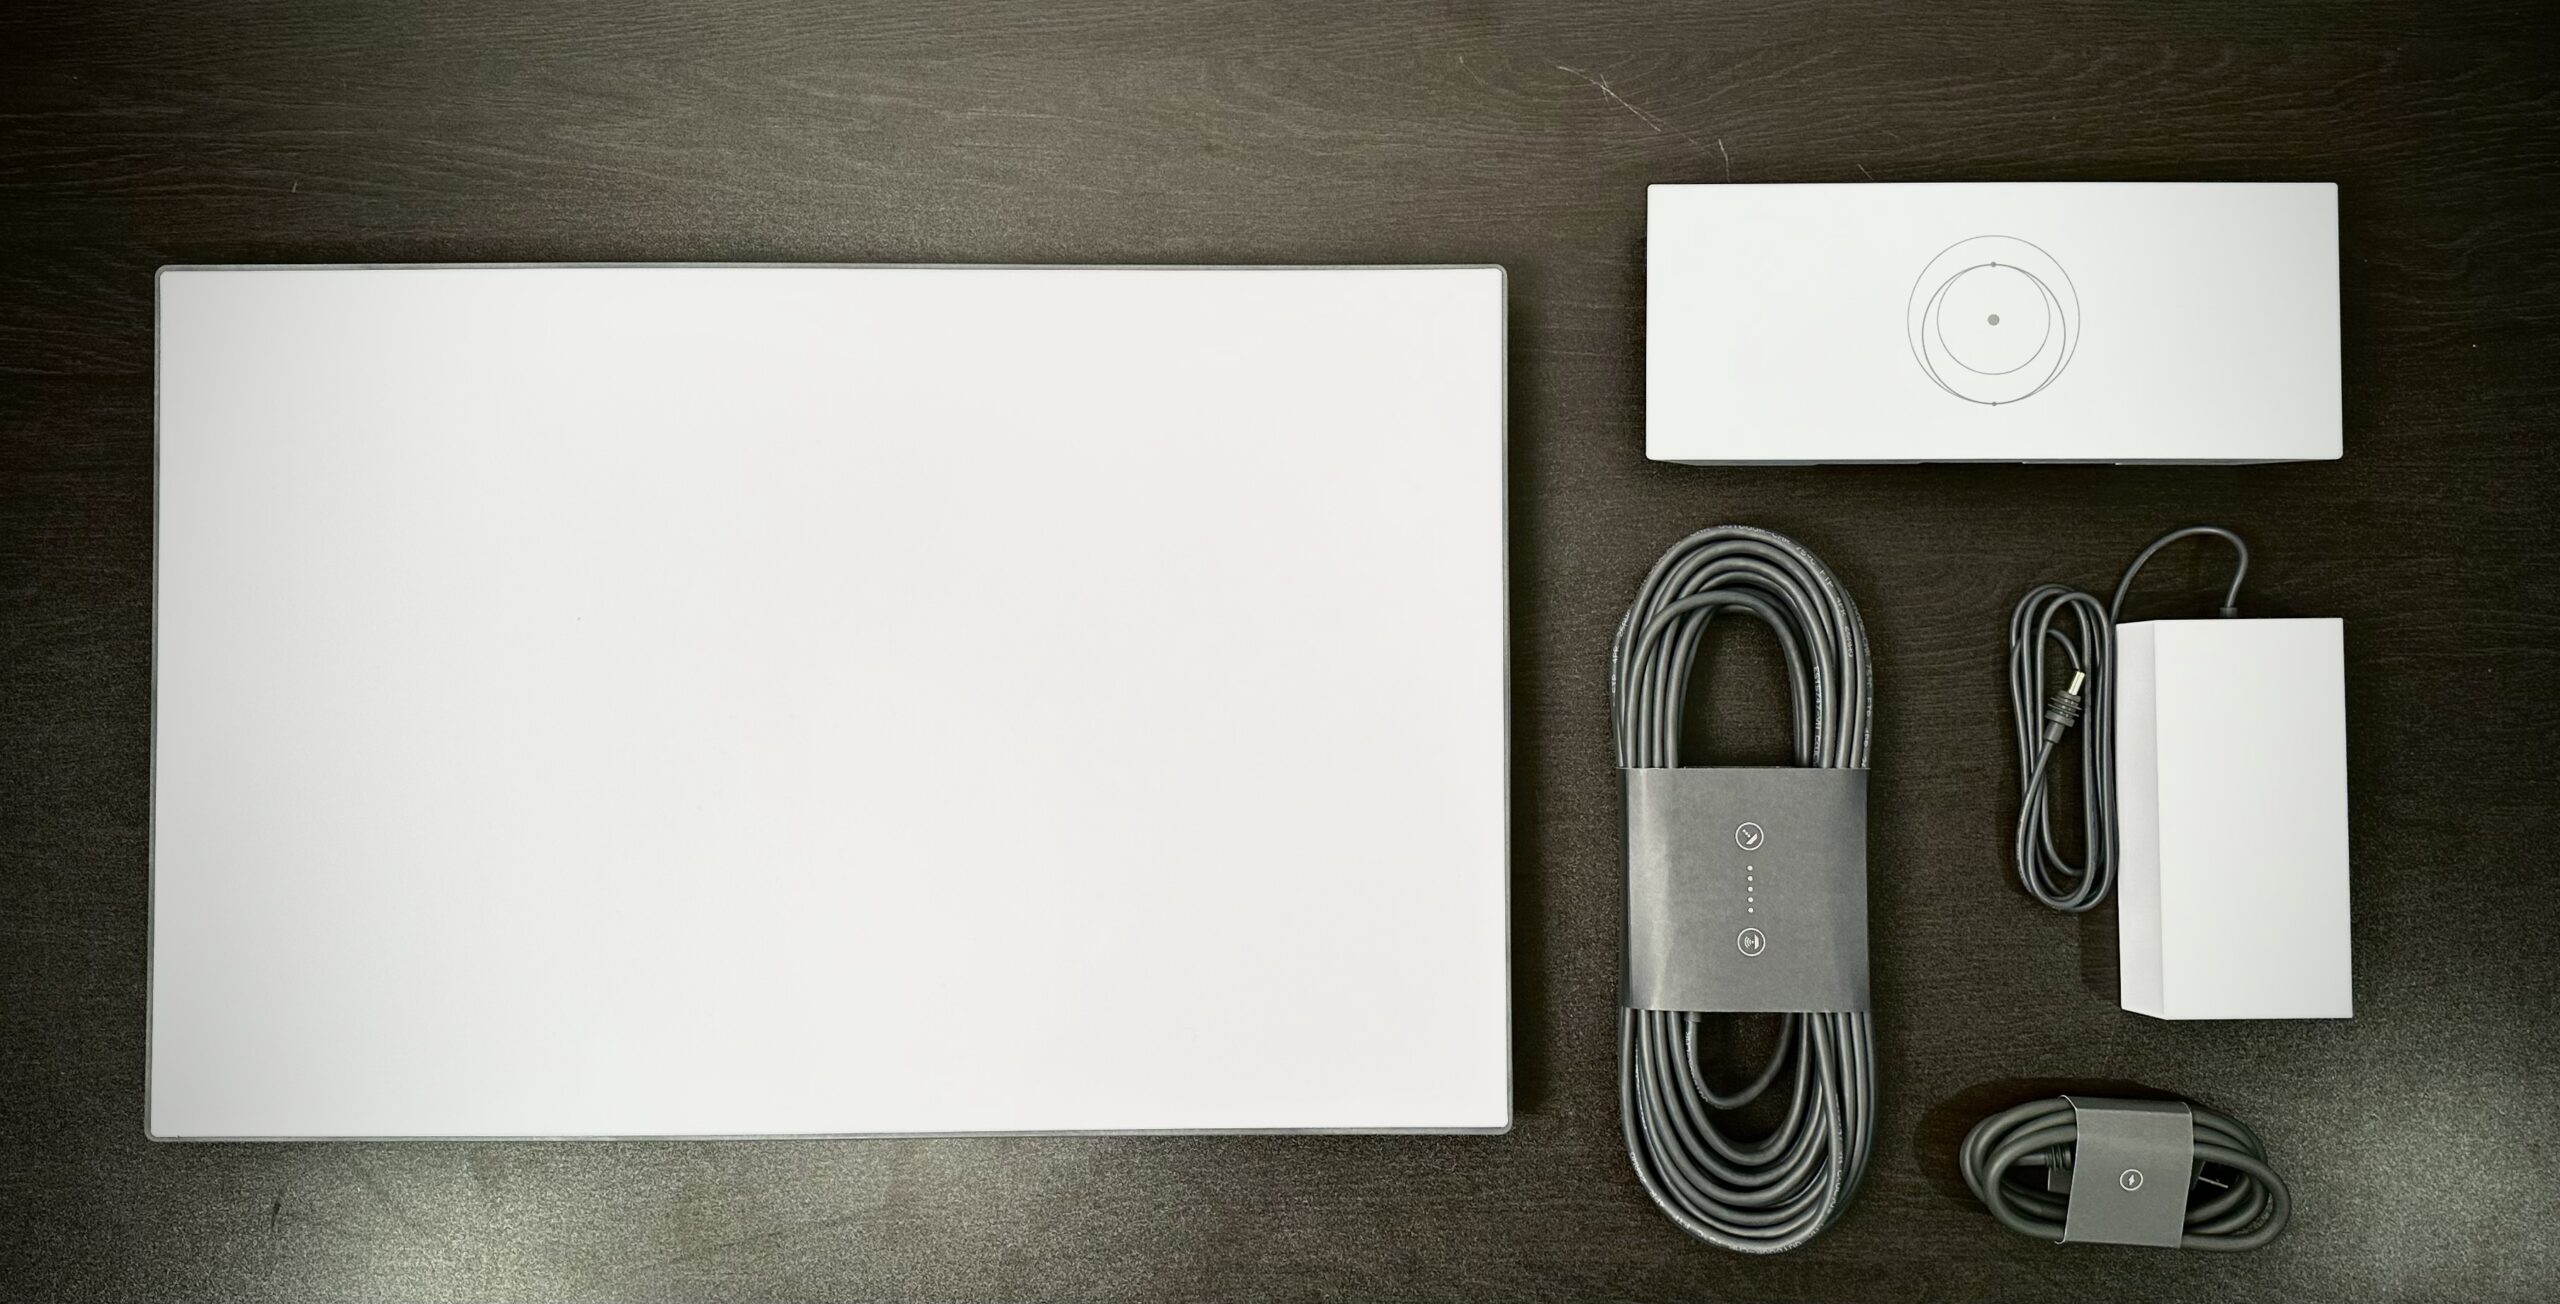
Tearing into a box filled with exciting new technology is my favorite part! Starlink makes the unboxing process pretty simple. Their packaging is minimal for the Gen 3 Standard kit. All I had to do was tear off the perforated strips found on three sides of the box. Make sure you have all of the following in your Starlink kit:
- Standard dish
- 50′ Starlink cable
- Wifi router
- Power supply
- AC power cord
- Safety information and instructions

Starlink App
The first thing you need to do is download the Starlink app. You can scan the QR code on the instructions in the box, or just search for “Starlink” in the App Store.
You need the app to set up and manage your Starlink system. You’ll use it to scan for mounting locations, to aim the dish, and to set up your Wifi network. After you’ve installed Starlink, you can manage everything from the app. It has a built-in speed test, performance statistics, and various dish and network settings.

Choosing a Mounting Location
Starlink is satellite internet, so the dish needs a clear view of the sky for optimal performance. Things like trees and buildings can interrupt the signal and cause issues. Starlink makes selecting a location really easy with the obstruction scanner tool in the app.
I chose to install my Starlink at the peak of my roof, directly on the fascia board. The higher the dish, the less chance trees will obstruct its field of view. To see if my roof was a suitable spot, I climbed up with my phone to use the obstruction scanner tool in the approximate location that I planned to mount the dish.

To use the obstruction scanning tool:
- Open the Starlink app.
- Tap Start Setup, then select your dish.
- Select Check For Obstructions to open the tool.
- Follow the instructions on the screen, rotating your phone around to scan the entire sky.
Once you’ve scanned enough of the sky, you’ll see the results. Red areas on the graphic indicate potential obstructions. Blue area is clear sky. If you have red areas, the app will tell you what kind of interruptions to expect if you chose to mount it in that location.

I recommend searching for a location until you find one with no obstructions. In my situation, I didn’t have any trees nearby, so the results were clear when I ran the scan up on the roof. With a good location selected, I tapped “Set Up Here” to proceed with the setup.
Mounting the Dish
Starlink is extremely versatile. You can use it as a portable system, like for camping in an RV. For portable use cases, you don’t have to permanently mount the dish. You can just use the included kickstand, and place the dish on the ground, a table, or maybe even on the roof of your RV.
For home internet, you’ll want to permanently mount the dish in a place that has a clear view of the sky, free of obstructions. Hopefully, you’ve already found such a spot by using the obstruction scanner that I went over in the previous section. Now let’s talk mounting.
I decided to use one of the mounts offered by Starlink for a permanent install on my roof. I selected the Standard Wall Mount when I purchased my kit. The Standard Wall Mount allows you to mount the dish to an exterior wall, fascia, or eave. In my case, I attached the mount to the fascia board at the peak of my roof. For more info on this mount and why I chose it, check out my Starlink Standard Wall Mount Installation Tutorial.

Every setup is going to be a little different. The details of every type of Starlink mount is out of the scope of this guide, but be sure to check my Starlink Roof Mount Guide if you need help deciding which type of mount is right for you. In the guide, I compare official and aftermarket mounts, and list various methods people have used to install Starlink.
If you are using the kickstand, place your dish in a good spot, and then tap “Continue With Kickstand” in the app. For permanent setups, install the mount of your choice, and then proceed with the setup process by selecting “Mount Is Installed”. Tap “Starlink Is Set Up” to continue.
Finding a Spot for the Router
The Starlink Wifi router should be installed indoors, as close to the center of your home as possible. You’ll need an outlet nearby to plug in the power supply. If you are forced to put the router in your basement or a corner room, that’s fine, there are other ways to improve Wifi coverage. Starlink offers a mesh system of their own, but you can also use aftermarket mesh systems and Wifi repeaters. Check out my tutorial on How to Set Up Starlink Mesh to learn more.
Since I installed Starlink on my roof, I chose to put the router in the room with the exterior wall that I mounted my dish to. This allowed me to route the cable down the side of the house, and then in through a small hole. Once inside, the cable will be able to easily reach the router that I positioned on a nearby cabinet.

The Standard kit includes 50′ of cable to go between the dish and the router. The cable needs to reach the router, so make sure you pick a spot close enough to the dish mounting location. If 50′ of cable isn’t enough, Starlink offers a 150′ cable, or you can plug in an aftermarket extension to the included 50′ cable. See my Starlink Gen 3 Cable Extension project for some ideas.
Routing the Starlink Cable
For permanent setups you’ll want to run the Starlink cable through an exterior wall, and then route it as best you can to the Wifi router. You will need to drill a 3/4″ hole to accommodate the connectors on the cable. The connectors are the same on both ends, so it doesn’t matter which way you run the cable. You will just need to make sure you have enough to stretch between the dish location and the router location.


If drilling through a wall sounds scary, don’t worry! Like with mounting the dish, Starlink offers accessories to help. I chose to purchase the cable routing kit from Starlink to make running the cable simple. The kit includes everything you need, like the drill bit, grommets, and sealant. I highly recommend picking up the cable routing kit, it makes this step so easy. Be sure to check out my Starlink Cable Routing Kit Tutorial if you need help installing it.
Once I routed the cable through my wall, I was able to hook everything up at the router. The Starlink cable from the dish plugs into the left port on the back of the router. The barrel connector from the power supply plugs into the port on the right. Finally, plug in the AC power cord to power the system up. Open up the app and tap “My Starlink Is Powered” to proceed with the setup.

Connecting to the Wifi Network
The Gen 3 Wifi router has an LED status indicator on the front, in the bottom left corner. After I plugged in the power supply, I noticed the light start to blink, and then turn solid after several minutes. A blinking light means the router is trying to establish a connection to the internet. A solid light means everything is working. After you plug everything in, I recommend giving the system 10 minutes to boot up before proceeding.
After several minutes, I opened up the Starlink app and selected “Open Settings” to open up the Wifi settings on my phone. I selected the new “STARLINK” Wifi network that was showing up. STARLINK is the default, unsecured Wifi network. For now, it’s fine to proceed with the setup, you can change the name and add a password later.

Once connected to the STARLINK Wifi network, switch back to the Starlink app and tap “Continue”. You might be interrupted by a prompt to log in to your Starlink account. Go ahead and log in if asked, otherwise just go back to the app to continue.
Aiming the Dish
With the app still open, I waited while the dish went through the start up process. During this time, the Starlink dish is talking to the satellites and determining its alignment. The Gen 3 Standard dish requires manual aiming if the alignment is too far off.
After a few minutes, my Starlink connected, but I saw a message that I needed to adjust the alignment. I just tapped the message to bring up the alignment tool. If you don’t see any message about the alignment, you can ignore the rest of this section and continue to the next step.
In the alignment tool you will notice a graphical representation of your dish, and a rectangular target area. The goal is to rotate your dish while watching the app, so that your dish lines up with the target. Whether your dish is installed on a permanent mount, or on the ground with the kickstand, it’s important to properly align the dish to get the best performance.

If you need additional instructions, visit my tutorial How to Aim Starlink.
Monitor Your Starlink
At this point in the setup process, I’ve already found a good spot for the dish, scanned for obstructions, mounted the dish, routed the cable, plugged everything in to the router, and completed the alignment. With all that done, Starlink is now running and connected to the internet. I could tell thanks to the information provided in the Starlink app, which guided my setup every step of the way.
The Starlink app is your key to managing your system. There are a couple things you should do in the app as soon as you’ve finished the setup process. First, set a new Wifi name and password. Setting a password will secure your Wifi network so that only authorized people can use it.
To configure my Wifi network, I just had to tap on the app message that said, “Router Not Configured”. I entered in a new network name and password, and then tapped “Submit”. You’ll have to open up the Wifi settings on your phone and reconnect to your new network.

The second thing you should do is log in to your Starlink account in the app if you haven’t already. To do this, just tap on the profile icon in the upper right corner of the app. Use your Starlink account credentials to log in. Logging in allows you to access more things in the app, such as viewing data usage, billing info, etc.
Once you’ve logged in and secured your Wifi network, you are done setting up Starlink! Use the app to make sure your system status displays as “Online”. If not, I’ll show you how to get help in the next section. The app also contains tools to help you monitor your system:
- Statistics – The Statistics section shows uptime, latency, and internet speed information over time.
- Network – View connected devices and configure network settings.
- Obstructions – After several hours, your obstruction map will fill in with data, allowing you to see if any objects have interrupted your Starlink service.
- Alignment – Access the alignment tool to make adjustments if necessary.
- Speed Test – Check out how fast your new internet service is by running a speed test.
- Settings – Change advanced settings, like custom DNS, content filtering, snow mode, and sleep schedule. Check out my Starlink Router Configuration Guide for more info.
- Support – View support documentation and request a service ticket.
How to Get Support
If you ever need help with your system in the future, Starlink has a collection of troubleshooting articles on the support section of their website, or under the “Support” menu in the app. Browse topics or search for keywords related to your issue.
I also wrote a detailed Starlink Troubleshooting Guide to help walk you through some of the most common issues and error messages that Starlink customers experience.
If those resources didn’t help, I recommend reaching out to Starlink support to have them take a look at your system. You can create a support ticket on the website or in the app. To create a ticket in the app, tap “Support” in the menu. Select the category related to your issue. Starlink will present a relevant article. If the information doesn’t help, tap the thumbs down icon at the end of the article. You will be directed to fill out a ticket request.
For more information on contacting Starlink, check out my guide How to Contact Starlink Support.
Frequently Asked Questions
No, you don’t need cell service to set up Starlink. The app doesn’t require internet access to go through the setup process. Once your dish is connected to the Starlink satellites, you’ll have internet service. If your Starlink subscription is inactive, you’ll still be able to access Starlink.com and use the app to reactivate and manage your plan. I wrote a full tutorial on How to Activate Starlink Service Without Internet.
Starlink cables are not rated for direct burial. If you need to run the cable underground, you will need to install it in conduit.
The Gen 3 router is designed to be installed inside. If your situation requires the router to be installed outside, I recommend using a weatherproof box.
The longest run possible from the dish to the router is 150 feet. You will need to purchase the longer cable from the Starlink shop on the website or in the app.
Official Starlink accessories for the Gen 3 Standard dish can be found at https://shop.starlink.com/. For help understanding all the accessories, I created a Starlink Gen 3 Accessory Guide.
Hi Colby.
My router was not working and I got a new one. When I connected the router (after an hour) I tried to set up the router. But the App says only that the router was not available. I was connected to WLAN “Starlink”.
Deleted the App and installed new……same. Installed the App on my iPad and my wife’s iPhone……always the same. The App can’t find the router.
Try this: Connect to the Starlink Wifi. Open the app. Click on the profile icon in the upper right. Find the Starlink connection labeled “local” and tap on it. Any change, or does it still say not available? You can send me an email to [email protected] with a screenshot of the Starlink app main screen if the problem persists.
I see Starlink only comes with a 1.5m AC power cord. Does this plug into the roof mounted StarLink or is it power for the router?
Does the StarLink need AC power or is the ethernet cable power over ethernet? Wondering were to place an electrical outlet if StarLink requires AC power. Thanks!
Starlink comes with a dish, router, and power supply unit. The power cord that plugs into the wall is for the power supply brick, which is mounted inside next to the router. From the router the Starlink cable connects to the dish to provide power and data. So really you just need a single power outlet inside where you plan to install the router.
can I switch from resdential to roaming
Yep!
Please i can not place order in Cameroon using Rwanda or Nigeria regional plan Roam after fill adresses and payment card. When i click to place order, nothing is happening. Please help.
I would wait and try again later. I think they were having an issue with their order system.
Hi i want to buy STARLINK from PORTUGAL for HOME.
where i can place order
Starlink.com
I can’t get my Dell desktop to connect to Starlink. My HP laptop connected quickly
Are you connecting with Wifi on the desktop, or with an Ethernet cable?
There is an issue on Mexico. I can’t install packages with NPM or Yarn for NodeJS development. I had to disable IP v6 to be able to install the dependencies, which is a tip I found after few months on Reddit. You should fix this or to elaborate a guide to fix this kind of issues please
I am getting 98% signal strength is this good enough to set up dish??
You might get obstruction interruptions but I don’t think it would be noticeable unless you are doing something like video calls.
I live in a motorhome, so I was thinking of getting StarLink internet installation to make it easier for me to access the internet from where I am at the moment. I appreciate you letting us know that StarLink installation is simple and straightforward, so we can easily get high-speed, low-latency broadband internet. I’ll keep this in mind while I look for services to call for my StarLink internet installation soon.
Thanks for these pages. I need advice on grounding my system. Can you help? Thanks
Sure, I grounded my original round dish, but not the newer models because they don’t have standard connectors. Starlink says the unit is already properly grounded, although I would still recommend grounding the mast on the roof.
Thank You Professor !!
I don’t want to drill a hole in the side of my house for the cable. Can I permanently attach it to my garage roof and still receive the connection from the modem inside my house?
The router is not really designed to be installed outside, and your Wifi signal will not be very good. It’s possible to install it outside, but not ideal.
I wanted to test my hardware (bought them used from someone else). I reset my router (three times plugging it in and out). Then I plugged it in and plugged the Starlink power cable in as well. I opened the app and did Start Setup –> (chose v2 dish) –> I have a location –> Next –> Open wifi settings. Here it asked me to connect to Starlink wifi. I did, and was prompted to setup a SSID and password for the wifi so I did. I then reconnected to the new wifi SSID and opened the app. But the app is still showing “Open wifi settings” and nothing is happening. Did I do any of the steps wrong?
No, but sometimes it takes several minutes for it to connect. Also, some phones will automatically switch you back to another Wifi network when the one you connect to doesn’t have internet access. So make sure it allows you to stay connected even though the Starlink Wifi doesn’t have internet. Let it sit there 15 minutes or so, then come back and open the app to check on it.
Also try to open up a web browser on a device connected to the Starlink Wifi, and go to http://dishy.starlink.com/ and see if that method works.
Just to make sure, at this point I have not paid anything to Starlink for the monthly subscription. Is that alright for this stage (e.g. using the app to make sure the hardware work)?
I have an additional modem and extension cable (both Starlink) to extend coverage in my two storey home – Is it as simple to plug the extension cable into the original modem, run it 95 feet to the area I want better coverage in and hook it into the second modem?
Or is it more complicated perhaps?
It’s even simpler actually. You don’t need the cable. The mesh nodes connect wirelessly. So just plug the additional Starlink router node on the 2nd story, open the Starlink App, pair the new node, and then that’s it!
I just setup my starlink dish and I named my network and gave myself a password. Unfortunately when returened to access my account it won’t accept my password. How do I reset my password as I must made a mistake.
On the Starlink.com login page, click Recover Account.
Unplug the power to your router and plug it back in as fast as you can six times. This will reset the router.
I am trying to set up my Linksys mesh system and having difficulty doing so. I put the Starlink in bypass mode and i could not get the Linksys to connect. It does work when I dont change it to by pass mode but keeps going in and out. Any idea what I am doing wrong? If I cannot get it to work I will order the Starlink mesh routers
The main Linksys router will plug into the Starlink Ethernet Adapter. The Linksys will provide DHCP and routing functions to your network. After you have the main router connected, put the Starlink router in bypass. Then you can add any additional Linksys mesh nodes. Are you following the Linksys instructions? I’m not sure which model you have so I can’t look it up myself.
Is there bolt holes in the stand , to be mounted on peaked roof
Yes there are holes in the stand, but it wouldn’t work on a sloped roof, as the Starlink mast needs to be vertical.
I live in AK, what is your look angle, I would like to check my house to make sure i have a good visible link to your network up here before I actually purchase.
I do have trees
There is an obstruction checker tool in the Starlink app that you can use to check for tree problems.
Approximately 15 degrees due North for AK. There is very limited satellite coverage in Alaska currently so frequent disconnects are common until more satellites are launched for the polar regions.
Maybe I am missing something but it seems that we can’t sign up without buying the hardware.
Does it mean that we can’t buy a used hardware form someone else?
We did buy a used set of hardware. The previous owner needs to do transfer. If you google Starlink transfer you can find the instructions.
You can buy used hardware. The seller has to submit a transfer request to Starlink. Starlink support will create a new account for you and transfer the hardware over to the new account, assuming your address has availability for the service. I have a guide that goes over the process:
https://www.starlinkhardware.com/how-to-buy-sell-and-transfer-a-used-starlink/
Just bought. Just unboxed. Set up the starlink dish on the stand and plugged to power. Nothing happened the dish hasn’t moved. What am I missing?
It takes several minutes for it to boot up and move. Make sure the dish connector is fully seated into the mast. See the picture above which shows what it should look like. What does the app say? Connect to the STINKY or STARLINK network and open the app.
D00 I have to control Starlink with my phone, or can I use Windows13on my new computer?
It’s easiest to control with your phone using the Starlink app, but you can also manage it from any web browser by entering the IP/URL in the article.
I’m about to jump in with Startlink. is the cable end propitiatory? I have access into the home with coax cable. Will I be able to connect with that?
No, the cable is proprietary.
How do I pause my Starlink. I have been through most of the information and cant seem to find where I can pause it
All I want to do is pause my subscription for the moment and re connect at a date in future
Thanks in advance
Only RV and Best Effort can be paused. Residential service cannot be paused.
With no Fedex service regionally, shipping is transferred to USPS for final delivery.
Has been 4 weeks now, but remote living has circumstance.
I’m unable to answer one setup question, that may not be a concern.
As the dish self-aligns it can tilt on one axis.
I intend a mast mount, so initial orientation choice gives me 360 degrees of choice.
I reside at 70.5 N, 156.5 W.
Could you guestimate a rule of thumb for compass direction that may be best for initial install test?
Winter solstice now, -22F, so trial/error is dicey.
The dish can rotate itself and tilt up and down, so you don’t need to worry about which way it initially points. It will go where it needs to go.
Bit by the obvious.
Tilt & rotate.. No wonder preference of direction has not been mentioned.
Appreciate this courtesy, again
can you install the router in your house attic or does it need to be inside close to your PC and TV?
It can be installed in the attic, although that wouldn’t be best for Wifi signals in the house. Ideally, it would be on the main level.
I found a spot, plugged everything it and got starlink internet on my laptop and phone. Then I went to add to a second laptop and got “Starlink not hooked up to internet”. Now my phone and laptop have the same error message. What can I do?
Do you see the Starlink Wifi network to connect to? What status does the Starlink app say? Any obstructions? Try rebooting the router.
I live in a area that has no communications. Can i set up Starlink without having the app connected to the internet?
Yes, you will be able to set it up without internet access.
So you can connect using the starlink app without cell service or internet?
You can connect to Starlink.com through your Starlink system, without internet or cell service. Setup can be completed without cell service or internet.
Will my wi-fi ready TV work with Starlink, or do I need something more?
If your TV has Wifi, it should work fine with Starlink without anything extra, assuming it’s within a good signal range.
what is the name of the starlink ap in the App store for apple. There seems to be more than 1 app to choose from
Starlink
Hello. I need to order the satelite for a rural place in kenya
Visit http://www.Starlink.com to see if it’s available for your address.
I live in very open spot in the mountains. There are some trees to the north, 200-300 ft from the house. I just spent 3 hours trying different spots and crawling around on the roof. Finding a clear unobstructed spot, I thought would be the easy part. It feels like you have to live in the desert to have enough unobstructed sky.
Trees 200 ft from the roof shouldn’t be an issue, unless you are at the bottom of a valley and the trees are on the side of the mountain or something. I wouldn’t think you would get obstructions for those trees, regardless of what the app says. Did you finally find a spot after all the effort?
I am going to try the spot that showed the least obstruction. I am not in a valley, but the trees are slightly higher elevation than the house. I am going to mount it to the gable at the west end, where the least obstruction was found. But, that has to wait for a new mount. The one that comes with the unit is useless.
Is it possible to check for obstructions before even ordering? Our house is surrounded by woods so hoping to check connectivity before ordering.
Yep! Just install the Starlink app, and use the obstruction viewer while standing in the location you plan to mount the dish.
Got starlink and it ran perfectly then quit. Support replaced the system. Installed it in temp spot and worked fine with new equipment. Moved it to permanent spot and installed but with THE OLD cable. Worked for a few hours then modem disconnected from dish. Support recycled the system and still no connection from modem to dish. For example dish wont store. No obvious breaks or cuts in the cable.
If it’s still the original cable, that would be my next troubleshooting step. Have them send you a new cable and see if that works.
Starlink is up and running. When I try to change my server from Verizon to Starlink on my computer, it asks for a SECURITY KEY. If I got one, I have no idea where to look for it. Do you? Thanks.
And this was easier than I thought, tho it would have been nice to know in advance that it might take a few hours to find it’s way and locate a satilitte.
It’s all good, other than that key… Thanks. Janice
During the setup, it asked you to provide a new Wifi password. That’s the key it is wanting. You can reset it in the Starlink app if you didn’t write it down or need to set a new one. Just go into the app, and then hit Settings.