Starlink Mini vs Standard
Which is the better Starlink hardware option, the Mini or Standard? In this post, I break down the major differences and compare use cases for each.
When I first signed up for Starlink several years ago, there was only one type of dish. Things have changed a lot since then. These days you have several different Starlink models to choose from, like the Mini and the Standard. But how do you know which dish is right for you?
I test and review Starlink products for this blog, so I’m in a unique position to offer some great insights into these two different dishes. I’ve used the Mini and the Standard extensively, both at home and for camping. I created this guide to help you choose the right Starlink dish for your situation. I’ll be going over the major differences between the two models, and letting you know which dish is best for various use cases.
Starlink Mini
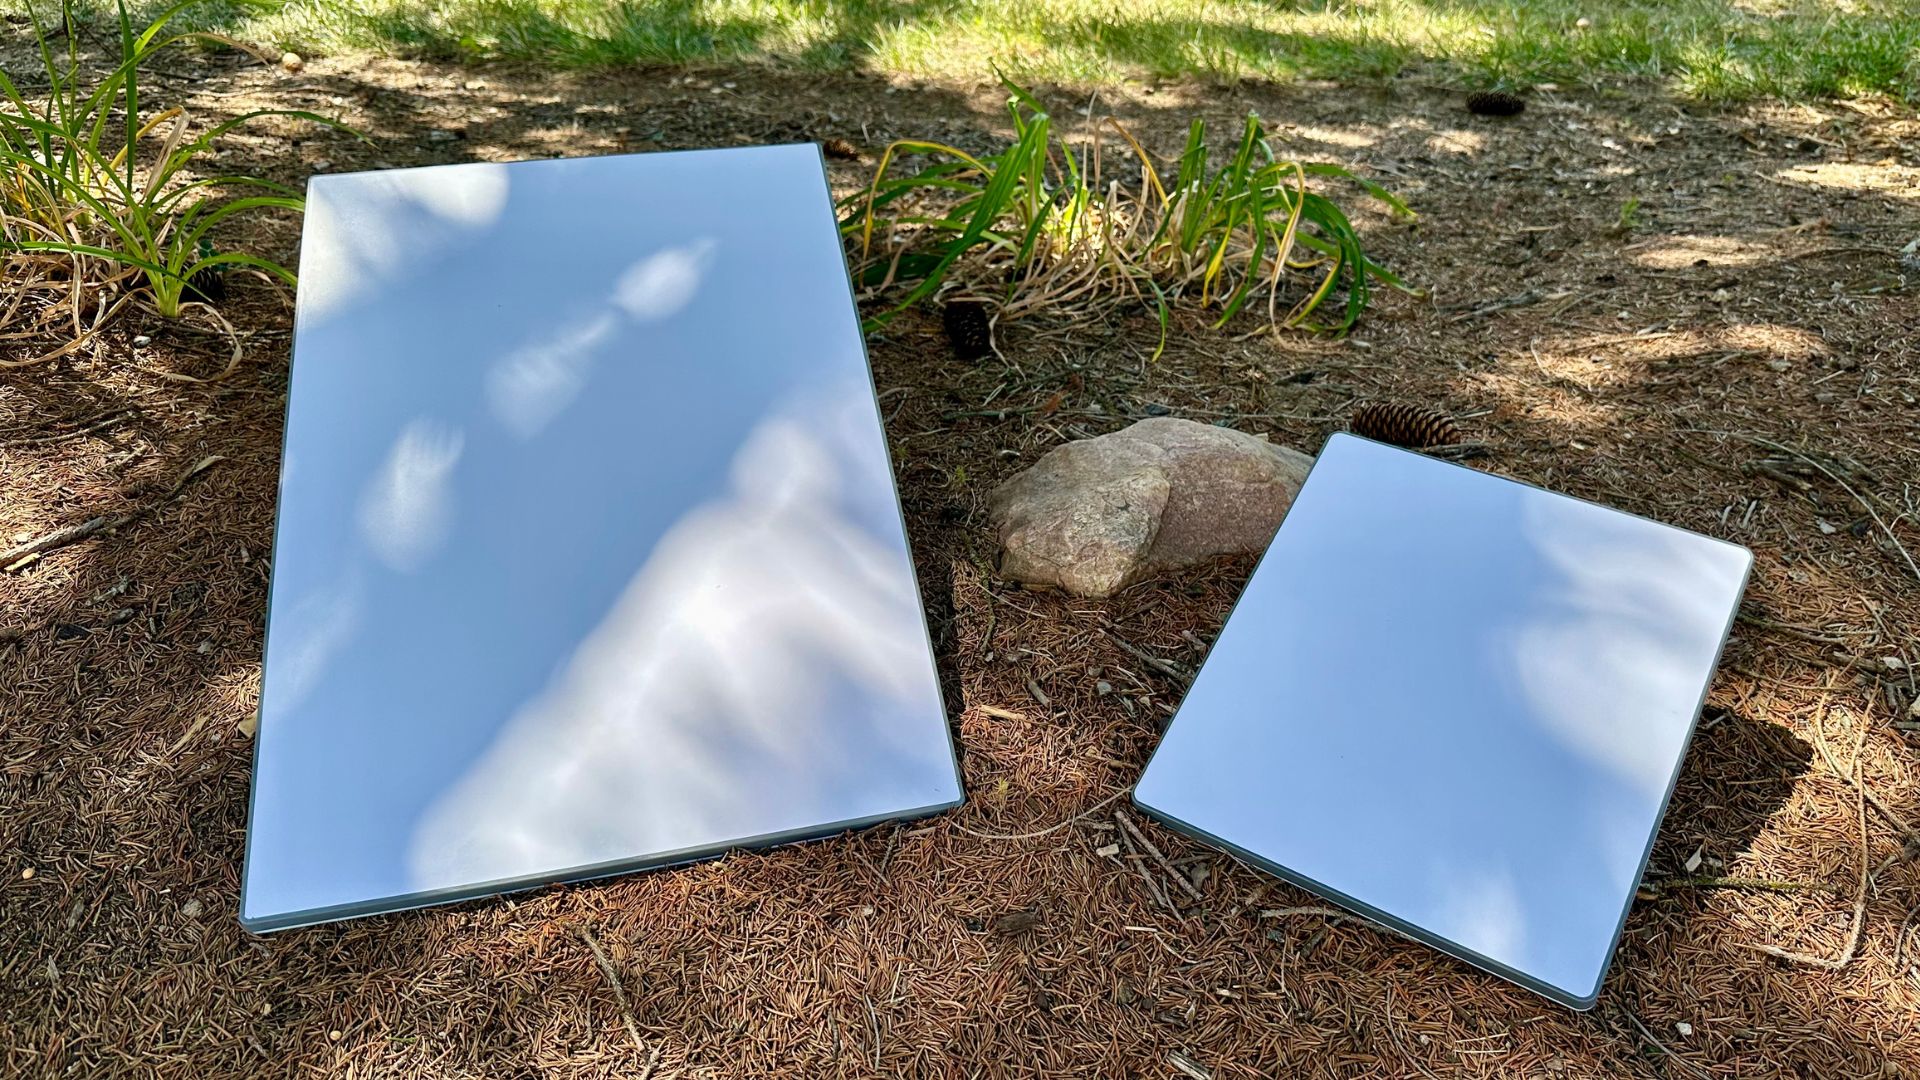
The Mini dish is Starlink’s latest innovation. Like the name implies, it’s a much smaller version of the Standard dish. The small form factor makes it ideal for travel and camping. It’s about the size of a laptop and weighs just a few pounds. The Starlink Mini is less than half the size and weight of the Standard.

Besides the compact size, the Mini has two unique features. First, the Wifi router is integrated into the dish. Unlike other Starlink models, there is no separate Wifi router or power supply. The other thing that sets the Mini apart from other Starlink dishes is its ability to run directly from DC power. You can power the Mini right from a USB-C port or a portable battery bank.
Starlink Standard
The Standard is Starlink’s third generation hardware. It’s a major departure from previous models due to the elimination of the actuators and mast. Older Starlink’s had motors which would automatically align the dish to the optimal direction. In the early days of Starlink’s satellite constellation, this was necessary for the best performance. By the time the Standard came out, Starlink had enough satellites, and the motors were no longer necessary.

The Standard and Mini are part of the same V4 hardware generation. They look very similar in terms of the design, with the Mini being a miniature version of the Standard. But it goes beyond just the form factor. The Standard has a separate Wifi router and power supply. The dish is mounted outdoors, while a cable is routed inside where the router and power supply are installed.
Key Differences
Now that you have a basic overview of each dish, let’s get into the key differences between the Mini and Standard.
Price
Mini: $499 at Home Depot and directly from Starlink
Standard: $349 at Home Depot & Starlink
The Starlink Mini is $499 in the US, which really surprises me. I assumed it would be less than the Standard, which costs $349. The Mini’s higher price tag could be due to its recent release. The Standard has been on the market for a lot longer, and actually started out at a much higher price ($599) before going through several price cuts to get down to $349.
The Starlink Standard has a clear advantage when it comes to cost. It’s nearly half the price of the Mini. The question you have to answer is whether or not the small form factor is worth the extra money. For me personally, I was excited about the Mini for camping and travel purposes. It’s so much easier to transport and set up due to the smaller form factor, and that helps justify the cost for some use cases.
Size and Weight
Mini: 11.75″ x 10.2″ x 1.45″ (298.5 x 259 x 38.5 mm)
Standard: 23.4″ x 15.07″ x 1.5″ (594 x 383 x 39.7 mm)
No surprise here. The Mini (~3 lb.) is much smaller and lighter than the Standard (~7 lb.). It’s an ultra-portable hardware kit that can fit in a backpack. The Standard dish, although smaller and lighter compared to previous generations, just can’t compete in terms of size and weight. The Mini’s integrated Wifi router makes it more simple and compact compared to the Standard’s external router and power supply.

Power Consumption
Mini: 20-40 watts
Standard: 75-100 watts
The Mini uses less power compared to the Standard. In my Starlink Mini Review, the Mini used in the range of 20-30 watts most of the time. I measured the power consumption of the Standard as well, and found that it typically uses between 40-60 watts.
I like that the Mini has multiple power input options compared to the Standard. With the Standard dish, you have to use the AC power brick. When I took it camping, I would have to use an inverter to get AC power from the battery system in my travel trailer. The Mini, on the other hand, can be powered from AC or DC. The kit includes an AC wall adapter if you have an outlet or an inverter. But you can also purchase adapter cables for the Mini to power it from a USB-C port or 12V car outlet.
Since the Mini uses half the power and has a wider variety of power input options, it has a clear advantage when it comes to off-grid scenarios. For example, I was able to build a self-contained Starlink Emergency Backup Kit using a small power bank, USB-C cable, and the Starlink Mini.

Performance
Internet speed and signal reliability is where the Standard dish really starts to show its strengths. Starlink doesn’t publish any specific speed ratings for either model, mostly because it varies so much based on service plan, location, time of day, etc. But I’ve done a lot of testing with both units under similar conditions.
Mini: My best speed test with the Mini resulted in 191 Mbps down and 15 Mbps up. Latency typically comes in under 50 ms.
Standard: In my testing with the Starlink Standard, I’ve been able to achieve download speeds over 300 Mbps, with upload speeds in excess of 30 Mbps. Latency is usually under 40 ms. The Standard is about twice as fast as the Mini in my own testing.
I think the difference in performance comes boils down to the following factors:
- The Standard dish has a more powerful antenna. It has a larger surface area, and a more powerful power supply.
- The Mini is less consistent and less reliable in bad weather. The weaker power supply rating of the Mini doesn’t allow it to push the signal past rain, snow, or ice as easily as the Standard can with its beefy power supply.
- The Standard has a much better Wifi router, which means better Wifi speeds and range. It’s Wifi 6 compared to the Mini’s Wifi 5 router. In my Starlink Gen 3 Router Review, I found that the Standard router was 4 times faster than the previous generation router at a distance of 50 feet. In a similar test, the Mini’s Wifi speeds dropped off dramatically at 50 feet.
Service Plan Options
Mini: The Mini is designed for travel, and the service plan options reflect that. You can use the Mini with any of the mobile plans, like Starlink Roam, but not with the Residential or Business subscriptions. The Mini can be used in-motion with any of the available plans.
Standard: The Standard is mainly intended for the fixed location service plans, like Residential and Business. But Starlink allows you to subscribe to any service plan with the Standard, including Roam. The Standard dish supports in-motion use with a compatible service plan.
The edge goes to the Standard as far as service plan options, since it’s the only option for Residential and Business service. The Mini is limited to the mobile plans, while the Standard can be purchased with any of Starlink’s plan options. Both models can be used in-motion.
Accessories
Starlink offers several accessories for both the Mini and Standard. There are roof mounts for both models, allowing you to permanently attach the dish to your home. Starlink also sells vehicle mounts for the Standard and Mini. I wrote a guide on the Best Vehicle Mounting Locations for Starlink Mini if you want to learn more about using the Mini in your car.

Longer cables are offered for both dishes, enabling longer distances between your power source and where the dish is placed. Also available are additional mesh Wifi routers, so you can improve the Wifi coverage for either system.
Since the Mini can be powered directly from DC, it has the edge in terms of power accessories. There are plenty of adapter cables that you can use to power the Mini from USB-C, a vehicle 12V outlet, an RV battery system, and more. These types of DC power adapters are not available for the Standard dish without additional modifications to the system.
How to Choose
Based on all the factors I’ve covered so far, I would say the Mini is better for travel use cases, like for camping, vans, and RV’s. It has a more compact design and lower power consumption. You can power the Mini in a variety of ways, like from an inverter, USB-C port, or a 12V car outlet.
The Standard is better for home internet since it’s the only option if you want the Residential service plan. But the Standard is also a good option for full-time travelers who rely on their internet connection. The larger antenna and beefy power supply makes it more consistent in bad weather. It’s capable of higher download and upload speeds. The Wifi router covers a lot more area and delivers better speeds.
You should get the Mini if:
- You need a small, light, compact dish for traveling.
- You don’t need a large Wifi coverage area.
- You want basic internet access for recreational purposes.
- Reliability and performance aren’t your top priorities.
You should choose the Standard if:
- You need fixed home internet or high-demand portable internet.
- You don’t mind having a larger dish that uses more power.
- You want the best speeds and reliability.
- You have a larger area to cover with Wifi.
Summary
Both the Starlink Mini and the Starlink Standard are great hardware options for a variety of use cases. The one big limitation for home internet with the Mini is that it’s not available on the Residential service plan, making the Standard the go-to option for installation on homes. On the other hand, digital nomads, campers, and other travelers will appreciate the Mini’s smaller form factor and more flexible power input options.
After using both for camping, I think the Mini is the better travel option, thanks to the ultra-portable design and low power consumption. It’s not a good option for fixed home internet due to the service plan limitations and weaker Wifi router. I’ve been using the Standard for home internet, and that’s where it really shines. The larger antenna with more power handles weather easily. And the router covers my entire house without any dropouts.
What plan is best for retired “snowbirds” that have two homes? We spend about 6 months each year in each location. Your thoughts?
Are you traveling between two countries, or just staying in one? If you are going to another country, your best option is to have two kits with two separate Starlink accounts, one for each country. If you are staying within one country, you could share a single kit between the two homes, updating the service address when you move. Alternatively, you could purchase two kits on the same account, one for each location. If you “buy out” the rental kit that Starlink gives you, they’ll offer you the ability to cancel or pause the subscription. That way, you’re only paying for service at the property you are using.
So glad i found this, lets talk reception! I live in a valley, and am a renter, cannot have a dish outside. ( i was hoping i could see about a mini for stationary because of size constraints! But i guess thats out for the time being) Would a dish work from a window? Even with a limited directional issue? I live in an area with no infrastructure updates We still have late 90s cable speeds no fibre and likely never will. They’re jumping the price to 135$/mo this year. I just wont be doing that!! Few options in my area but im really torn on it because i dont know if a starlink would work here with the issues i just mentioned. Any thoughts?
Thank you, we are planning on moving to a different state next year and I wanted a fixed dish but I wanted a mobil availability until then . You’ve given me good in-site on which way to go.
I received a standard dish from someone I did some electrical for and got interested in Starlink. Unfortunately he did not keep the box with the second s/n on it so I need to purchase a new one, and Home Depot has them down in the mid $200’s, thank you again.
Since dishes that are on the Roam plan have traffic deprioritized to dishes on a Residentail plan, wouldn’t that impact your speed tests?
Colby thank you for the comparison, much appreciated as this helped me to go for the normal dish as will be working in our camper during travel.
I do have a question though and it’s about the usage outside of your own country for max 2 months. We’re living in the Netherlands which unlike the USA is very small, so within 2 hours travel we’ll be in a different country. Do you know if Starlink will consider this in Europe as otherwise Starlink will be quite useless for EU travel when it’s more than 2 months?
From what I’ve seen, the 2 month rule only comes into play when trying to abuse Roam to get around availability restrictions. For example, using Roam as a way to buy Starlink in one country, and then use it as home internet in another country. I haven’t heard of any legitimate travelers running into issues using Starlink Roam for more than 2 months in approved countries. I think you would be totally fine 2+ months in another country.
Been with Starlinkfor about a year I am a senior and I’d like to know how to get a discount. My age is 72.
They don’t have any kind of senior discount, the only discounts they have are if your address is in a high capacity area. Any available discounts are automatically applied to your bill.
Greetings from Down Under!
I bought the mini because I’m travelling in remote regions of Australia, where there is literally no mobile service (or if it’s there, it’s 3G or at best 2 bars of 4G).
I have used the Starlink twice. The 1st time for a 20 minute video call. Result: 16GB used. The 2nd time for streaming music for an hour. Result: 9 additional GBs. The total of 25 GB is half my monthly plan! Does that seem an accurate reflection of my data use?
Regards,
Den
The video call sounds about right, but 9GB for an hour of music doesn’t seem normal. You can check data usage on each device. It’s possible they are running background tasks, like syncing files/photos to the cloud over Wifi.
Den,
A 20-minute video call can easily use anywhere from 1–4 GB per hour in HD, so I’d normally expect something closer to 0.5–1.5 GB for a 20-minute call. Likewise, music streaming is usually only around 50–150 MB per hour.
However, Starlink counts all data transferred, not just the app you’re using. If your laptop or phone was connected, it may have been uploading photos or videos, downloading updates, syncing email attachments, backing up devices, or otherwise using data in the background.
In my experience, 25 GB from just a 20-minute video call and an hour of music streaming seems unusually high unless there was other background traffic occurring at the same time.
I’d suggest checking your device’s data usage statistics and repeating the test with background syncing disabled.
By the way, I have been trying to get hold of you regarding my uncle, Paul White, who I believe you knew. I couldn’t find any other way to contact you, so apologies for the forum post. There is some family news I’d like to pass on when you have a moment. If you see this, could you please get in touch with me or one of the White family members?
Thanks,
Ben White
Apparently I put off getting the Roaming too long. 🙂 They only offered me the choice of the Mini antenna at the higher price. It is supposed to arrive tomorrow. If the Standard does better with obstructions (trees to the south in what I expect will be my usual location) is there any issue with getting an Standard and just swapping it out?
Nope, should be able to order a Standard and return the Mini for a full refund.
Do you have both on two different plans and only activate the Mini when you’re traveling or how did you do this? Is having both and option and you only activate the Mini for the time you’re traveling and keep the Standard at home? I was trying to figure this out as I’m not trying to get on my roof and take my Standard with me when I want to travel.
I have both on different plans. The Standard is my home unit on Residential, it just runs all the time. The Mini is on the Roam 50GB plan that I keep paused most of the time. I activate it when I need it for traveling.
Great review @Colby Baber, as per your usual. Thanks!
One question, tho: what about router delete? I understand it’s not possible on the Mini, but would activating bypass mode on it reduce power consumption? Also, what’s the consumption on the Standard without the router?
TIA!
Thank you for continuing to offer great info about Starlink!
We are off grid and are extremely thankful to Elon for what he and his people have accomplished over the years.
Prior to Starlink, when we would make our trek to town we spent a large part of our time online and on phone calls. Now with Starlink we have great internet streaming and internet phone service👍🏽
Thank goodness for the heated dish even though it seems to use a lot of power.
Hi,
Thx for the article. I am currently using Starlink gen2 actuated for camping. I have a 3rd party router and modified Starlink to run directly off 12v battery. It has been working flawlessly. However, I like the idea of a smaller form factor and less power consumption. I’m wondering, even though the mini has the router built-in, could you bypass that with a 3rd party router? (like I did with the gen2) Would this give me the smaller form factor and less power demand, but still provide the speed and connectivity advantage of gen2?
Yes, the Mini has bypass mode that disables the internal router. You could use your existing 3rd party router. I wouldn’t expect as much speed or reliability as the Gen 2 antenna, but if form factor or power are more important, it’s worth the switch.
Thank you for the review! I think I can use even the standard one for traveling in an RV, because of the price and higher speeds. But it’s a bummer I cannot subscribe to 50GB Roaming with the Standard one! I really don’t need the unlimited plan.
Although you can’t buy the Standard dish with the Roam 50GB plan, you are able to switch to the 50GB plan after one month. For some reason Starlink just changed this in the last week. You used to be able to order the Standard with the 50GB plan right away. So now you’ll just have to pay for at least 1 month for Roam Unlimited, and then you can switch plans to Roam 50GB.
Thanks, Colby, very helpfull!
As always, SUCH a useful article – thanks. I’m curious: with the Mini’s lower performance in terms of speeds, is that also due to the integrated wifi router? If I bypassed through a LAN direct into my macbook (I don’t particularly need or want wifi) would there be less likelihood of dropouts? And might it even consume less power in bypass mode? Is this something you’ve tried?
And, while we’re on it, is that possible? To not use a 3rd party router but just run the LAN directly from the Mini (through an adaptor I already have) into my Macbook?
Thanks!
When I tested the Mini I ran the “Advanced Speed Test” in the app, which runs the test right on the router itself. So no Wifi variable. It’s essentially the same thing as running a speed test from a laptop connected via Ethernet.
It is possible to connect devices directly to Ethernet LAN on the Mini, but you wouldn’t want to enable bypass mode. Bypass mode turns off all routing functions, so your MacBook wouldn’t be assigned an IP address and likely wouldn’t connect to the internet as a result. It’s best to just keep it on and connect devices via Ethernet if you don’t want to use Wifi. It only uses a few watts of the total power consumption.
Amazing. Thanks so much for all these incredibly valuable and helpful insights!
Please which starlink is the best for IPTV stream
For home internet I would recommend the Standard. There is nothing specific to IPTV that would influence the decision. But the Standard tends to perform better overall so that’s what I would go with if you aren’t concerned about size, weight, or power.
I’ve been trying to buy an extender, but nobody answers me on your website and there’s no place to buy it on the Starlink app!!
Could someone please help me?
What do you mean extender? The best way to extend the Wifi signal is by creating a mesh network. I recommend reading through my Starlink Mesh Network Guide for more info on that. But if you have further questions feel free to post a reply here.
Wow, this is a better summary than I’ve found in 100 youtube and reddit pieces. Please consider a set of follow ups on some of the topics, such as DC power setup. The Mini is not as straightforward as it appears, and using DC with the biggie not as daunting as we might think. Also, please let me know how this proposed power increase might narrow the performance gap. https://www.pcmag.com/news/speed-increase-spacexs-starlink-to-boost-power-on-v4-and-mini-dish-models THANKS
With gen3 standard how far of a cable can I use From antenna to router? I need to go between 275-300 feet. Can you recommend what cable to use and what gauge wire.
Is there another way to get the signal I need. I am in a highrise condo. I was going to put the antenna on the roof and run cable down a pipe chase to my unit. I have 120 volt power at both ends. Thanks for your help
The max cable distance is 150 feet according to Starlink. Beyond that, you run into voltage drop issues. It would be best to install the dish, router, and power supply on the Standard on the roof, and then run Ethernet from the router to your condo. You can run up to around 300 feet of Ethernet before running into signal issues. You would need another Gen 3 router (or aftermarket router) in your condo that you can plug the Ethernet cable into.
Colby, the Starlink website – says $165 / month for unlimited data on the standard. Equipment cost is $350.
How do these devices do when you are in the trees or a forest? If you wanted reliable service would you put it on the top of your camper, or have an umbilical cord so you could move to more open spaces.
is there any aiming required?
If you have trees blocking a lot of the sky, expect frequent interruptions. For most internet activities, like checking email, browsing the web, or watching YouTube, you probably won’t notice many of the interruptions. But for video calls or gaming, it won’t work very well with obstructions. I’ve done a lot of camping with Starlink and I almost never have a clear view of the sky. My strategy is usually to keep the dish free so I can position it in a clearing near my camper. I aim it to open sky or straight up. In some cases I will make adjustments just to see if I can improve the interruptions with trees around, and it does seem to help if you have a few minutes to adjust where it is pointing.
Aiming is recommended based on what the Starlink app says, but when camping, I never really follow the alignment suggestion. I lay the antenna flat so it’s pointing straight up, or aim it at the clearest part of the sky. This has worked well for me. Aiming/alignment in the Starlink app is mainly for home internet use where there are no obstructions, so home users can get optimal performance. For campers, the goal is to minimize obstructions from trees, so it’s often best to ignore the alignment and just find clear sky. The alignment suggestion in the Starlink app doesn’t take obstructions into account, it just wants you to point to the area of the sky with the most satellites for your specific location.
Thank you for this page where I can quickly find everything I’m interested in regarding Starlink antennas. Since March, I have already bought 3 antennas and they all have some application. I live in Serbia, where Starlink should be activated this year, so I bought antennas in Greece and Germany. I use one in an apartment on the Greek coast instead of ADSL and I made a good choice. I cut the second one, the same generation 2, removed the motors, made a power supply with POE and thought I would use it on an RV, and then a Mini antenna appeared, which I immediately bought in Croatia. I gave this modified one with POE to a friend and now I have a problem to find a stable and safe support for the Mini antenna and to place it on the roof of the camper, which is plastic, so that the options with magnets fall away. I looked on internet portals and I found absolutely nothing smart. I am looking for a bracket that I will stick on the plastic roof of the camper and it must allow me to remove that Mini antenna and use it in another place when I need it. In particular, I transfer it to the car when I go somewhere with a bad 4G network signal. I put the antenna under the windshield and it works on 12 V without any problems. The only thing I can’t find is a stable bracket for the plastic roof of the camper that is made for the Mini antenna. These supports that I looked at do not give me hope that they would withstand a speed of, say, 120 km/h. So the condition is that the antenna can be removed and placed in another vehicle if necessary. If you have a link that I don’t know about, I would be grateful if you could post it or send it to me at [email protected]
Thanks a lot in advance
Standard Kit on the Roam Regional plan with a 2nd router used as a mesh node. I mounted the antenna on my travel trailer that is parked on the side of the house. The orientation of the parked trailer happens to be the perfect orientation required by the Starlink. I also mounted the router in the trailer- its signal can be received inside the house in the room that has its outside wall adjacent to the trailer. I placed the 2nd router in this room configured as a mesh node. Its Wi-Fi signal covers the entire house. This setup gives me full coverage at home and when traveling, and I don’t need to do anything to switch between the two – just drive away. Since Starlink added In-Motion to the Roam – Regional plan, I’m considering running a second Starlink cable into my truck (using a waterproof coupler) because it has a 120VAC receptacle. This would give me in-motion reception for using navigation, internet phone, and other internet access when out of cell coverage. All with a single Starlink kit plus a mesh node.