Starlink Mini PoE (Power Over Ethernet) Modification
The Starlink Mini doesn’t support PoE, but a simple modification allows you to use an external WiFi router with a single cable run.
The Starlink Mini is so compact thanks to its integrated WiFi router. But that advantage creates a problem in some use cases. If you’re mounting a Mini to the roof of your home or RV, the WiFi signal from the integrated router might have a tough time reaching inside.
One of my YouTube subscribers left a comment describing this exact situation. They have a Starlink Mini mounted to the roof of their aluminum Airstream travel trailer, and were having issues getting a solid WiFi signal inside.
The solution is to use an external WiFi router, like the Starlink Router Mini, installed closer to where you will actually be using your devices. But that introduces another issue. The Ethernet port on the Mini doesn’t support power over Ethernet (PoE). That means you would need to run another cable (in addition to the Mini’s DC power cable) to connect an external router.
I think I may have found an alternative. Why not modify the Starlink Mini to use PoE? Here’s how I did it.
This post may contain affiliate links. See our policy to learn more.
Overview
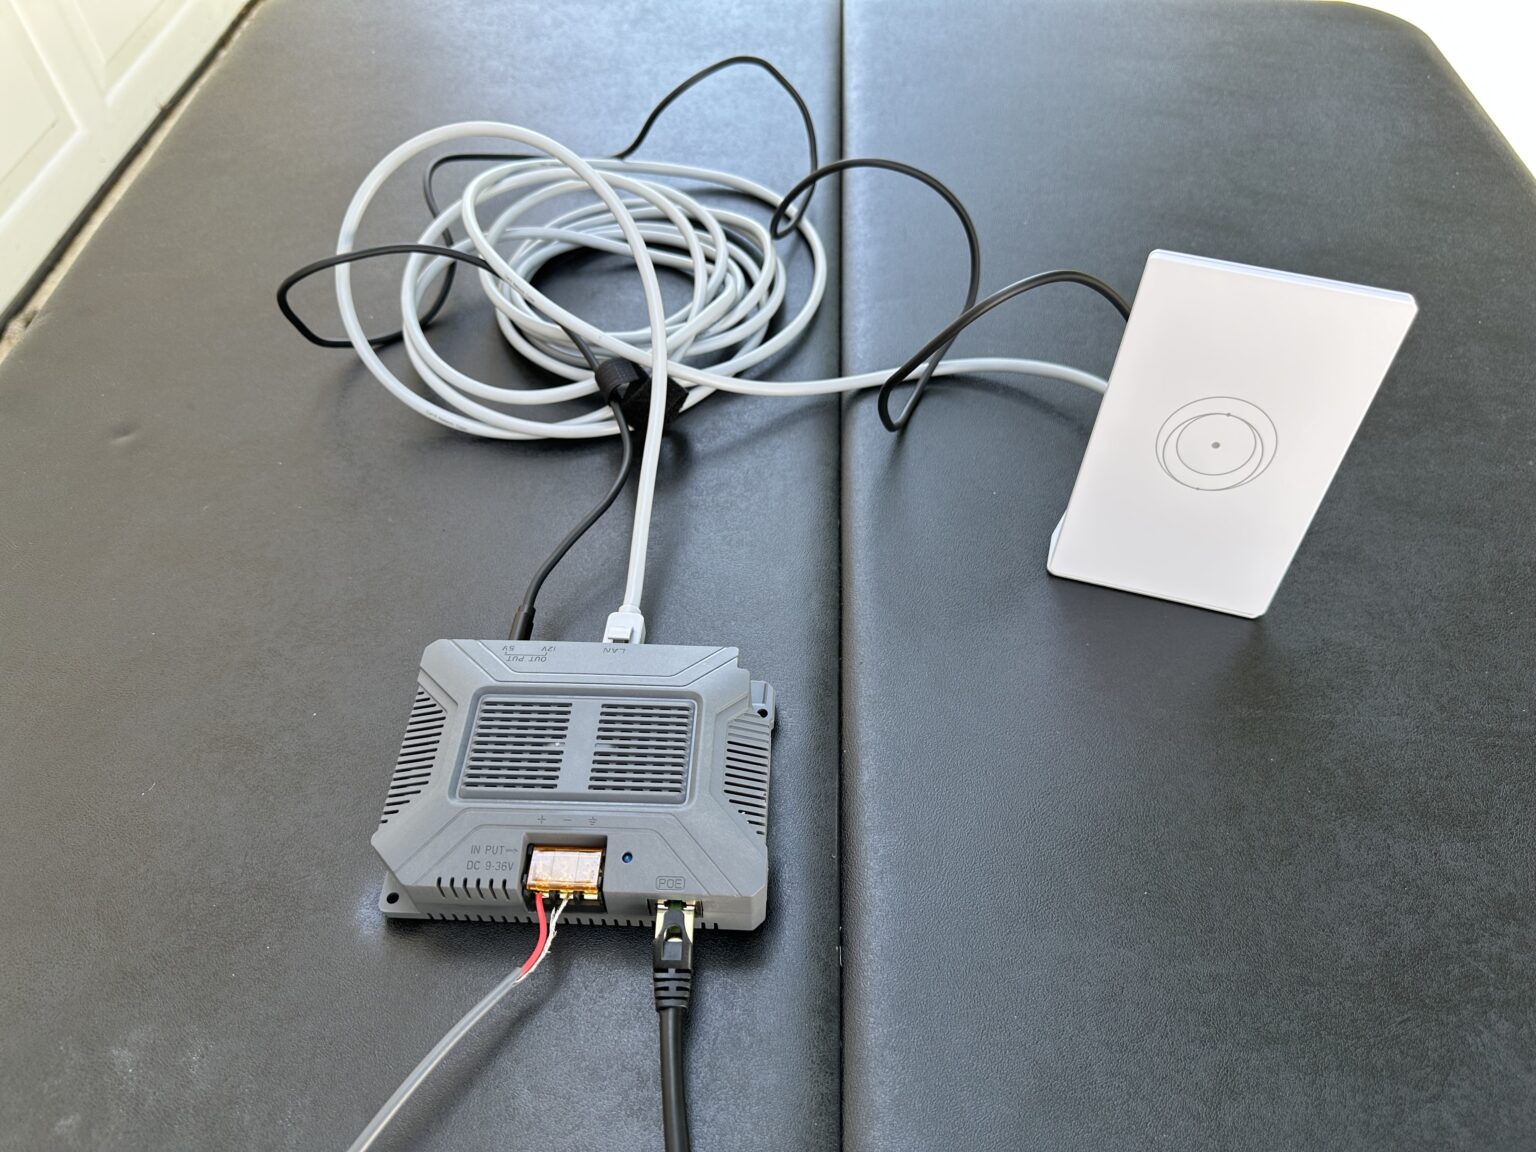
I found a product that solves this problem. It’s the EDUP Starlink Mini PoE Injector, which I found on Amazon. It adds PoE support to the Starlink Mini by using a PoE injector and splitter cable to divert power and data to the appropriate ports on the back of the dish. That means you can run a single Ethernet cable to the Mini, simplifying your installation.
It’s a pretty simple device. You just need to supply power to the included PoE injector, then run Ethernet cable to where your Starlink Mini is installed. On the dish side, the splitter separates power to the Mini’s DC input, and data to the Ethernet port.
Components Used
In addition to the EDUP PoE injector/splitter, you will also need an external router. I used the Starlink Router Mini, but any kind of WiFi router should work fine. Be sure you have an Ethernet cable to connect the router to the EDUP PoE injector.
Powering your router is another factor to consider. The EDUP PoE injector has a 12V USB-A port and a 5V USB-C port. I used the USB-C port to power my Router Mini using a cable I found on Amazon.
You’ll also need some Ethernet cable to run between the PoE injector and the Starlink Mini. I recommend no more than 150 ft of CAT6 cable. Use outdoor rated cable if it will be exposed to the sun or elements. It doesn’t need to be shielded or anything special, but avoid using cable that has strain reliefs. The waterproof cap on the EDUP splitter isn’t very wide, so strain reliefs won’t fit through the opening. You could probably use a Starlink cable if you trim away some of the rubber seals around the connectors.
Finally, have some basic hand tools around in case you need them. I recommend a screwdriver, cutters, and wire strippers.
Supplying Power
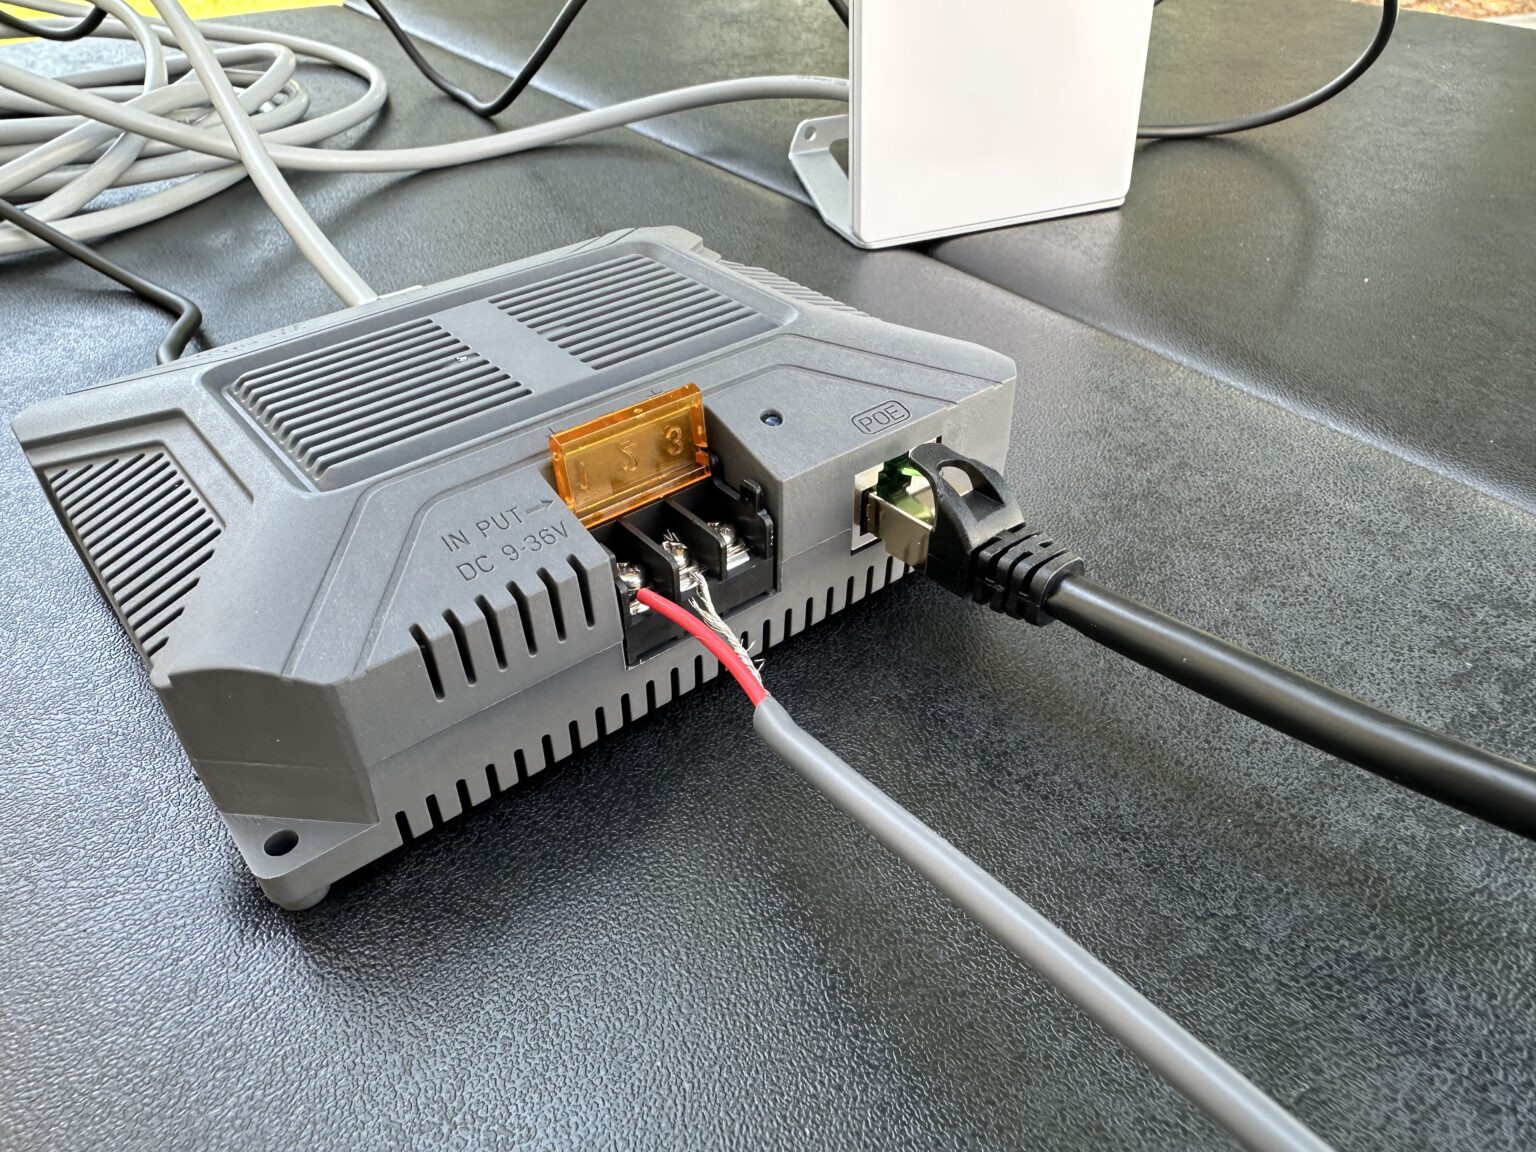
The EDUP Starlink Mini PoE injector is designed for battery powered applications, like in an van or RV. The PoE injector just has positive, negative, and chassis ground terminals to hook up to a battery or fuse box. That’s awesome if you will be installing this in a vehicle, but what if you want to use this for a home installation?
To use this PoE modification with an AC wall outlet, I decided to just modify the Starlink Mini wall adapter and DC power cable. These are both included in the Mini kit. The Mini’s AC adapter outputs 30V, which is within the input range of the EDUP PoE injector (9-36V). I cut off one of the DC barrel plug connectors on the Starlink Mini DC power cable, stripped back the wires, and matched the positive and negative wires to the power input on the PoE injector.
Connecting the Ethernet Cable
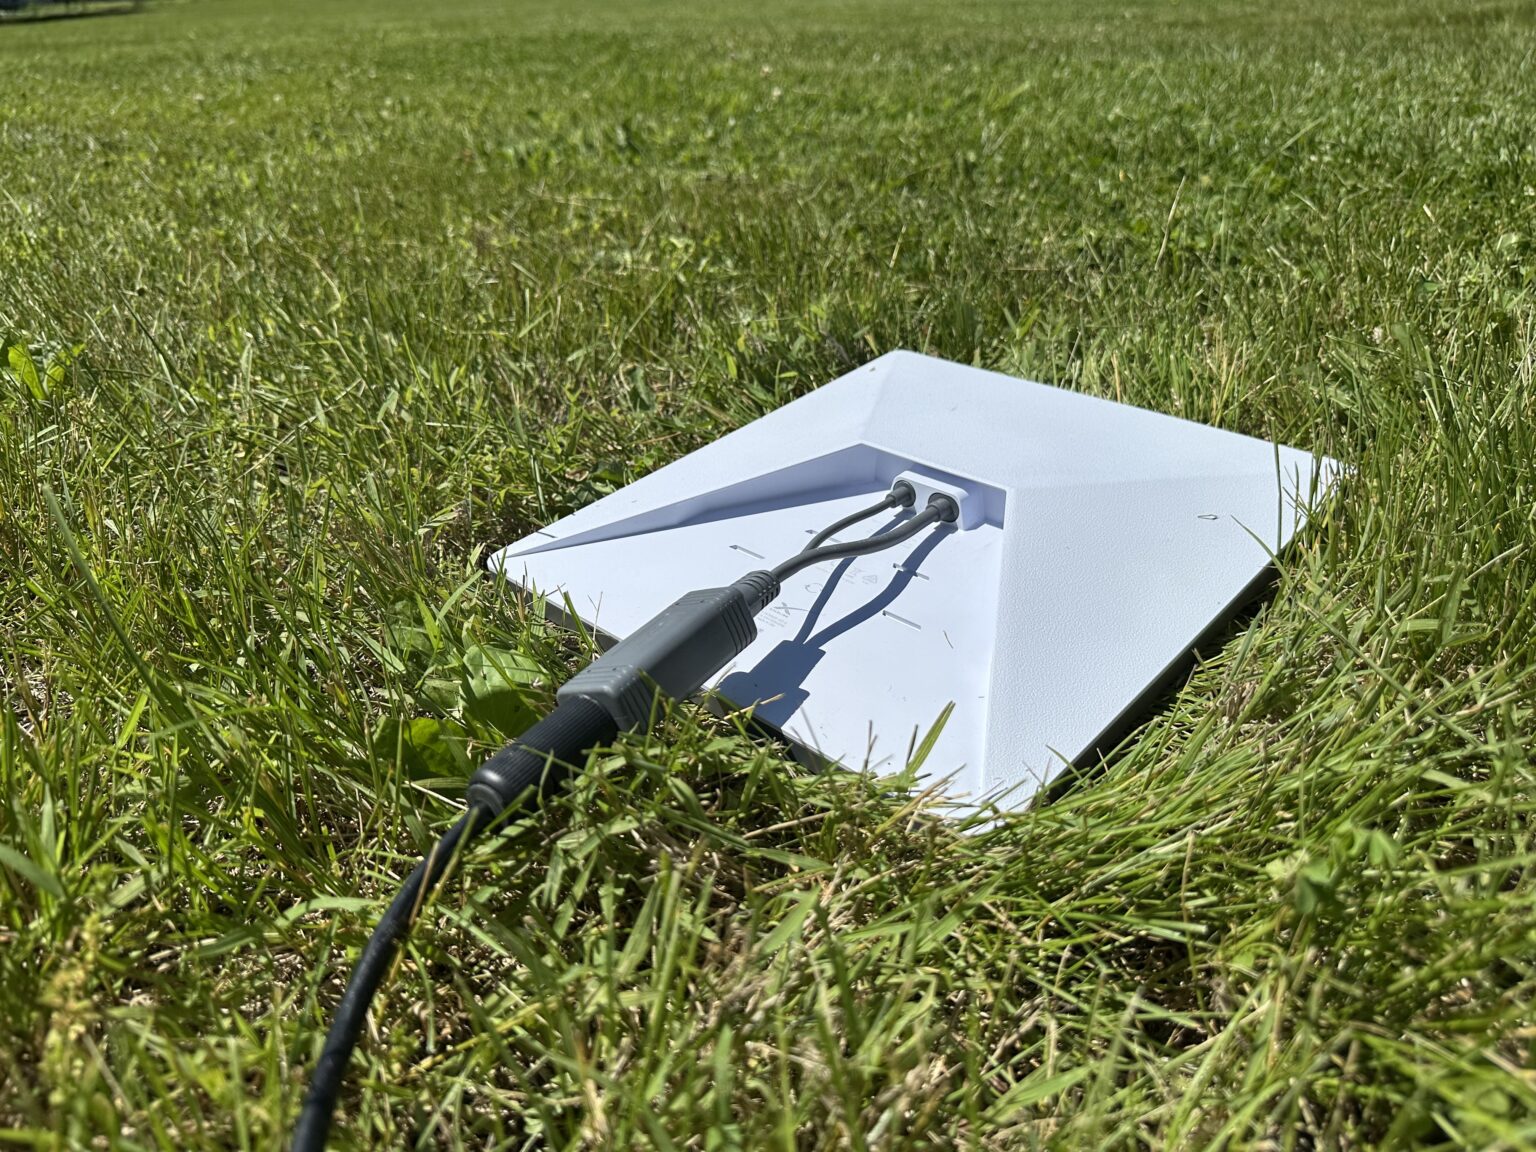
Next, run your Ethernet cable between the Mini dish and the PoE injector. For this review I just placed the Mini in the middle of my yard, and ran about 100′ of Ethernet cable back to my garage where I had the PoE injector plugged into a wall outlet. Connect one end of the Ethernet cable to the PoE port on the EDUP PoE injector.
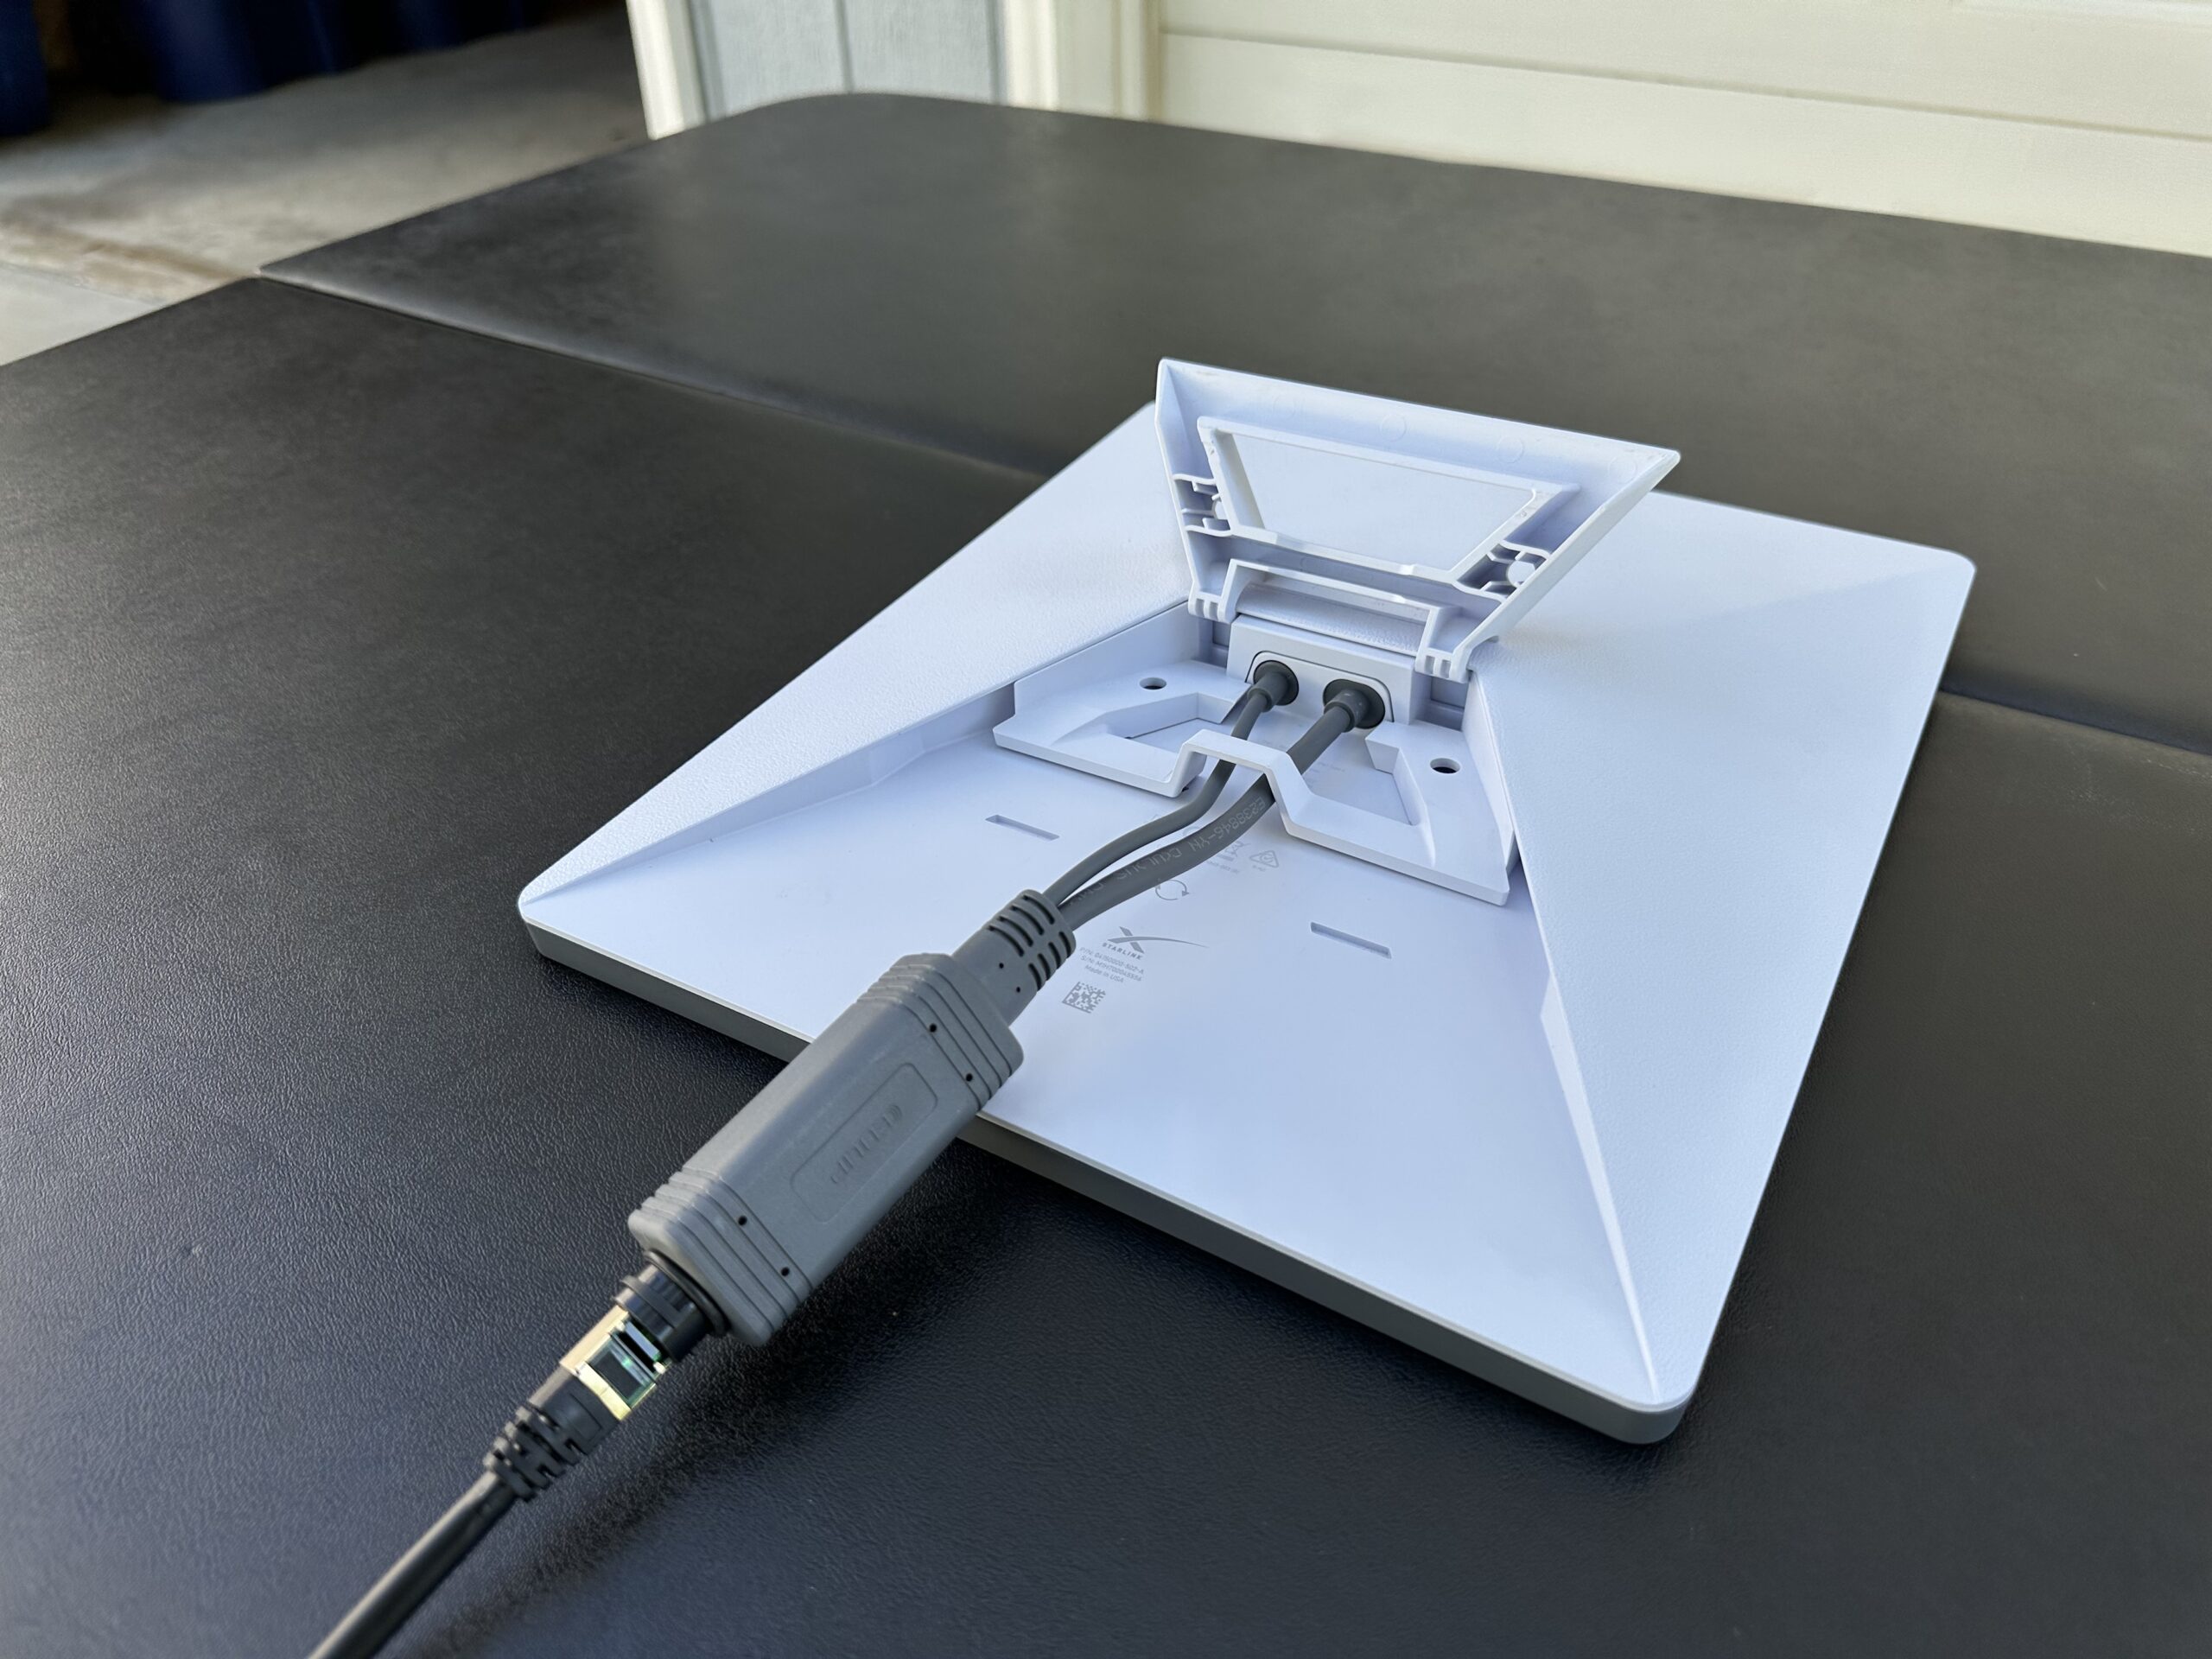
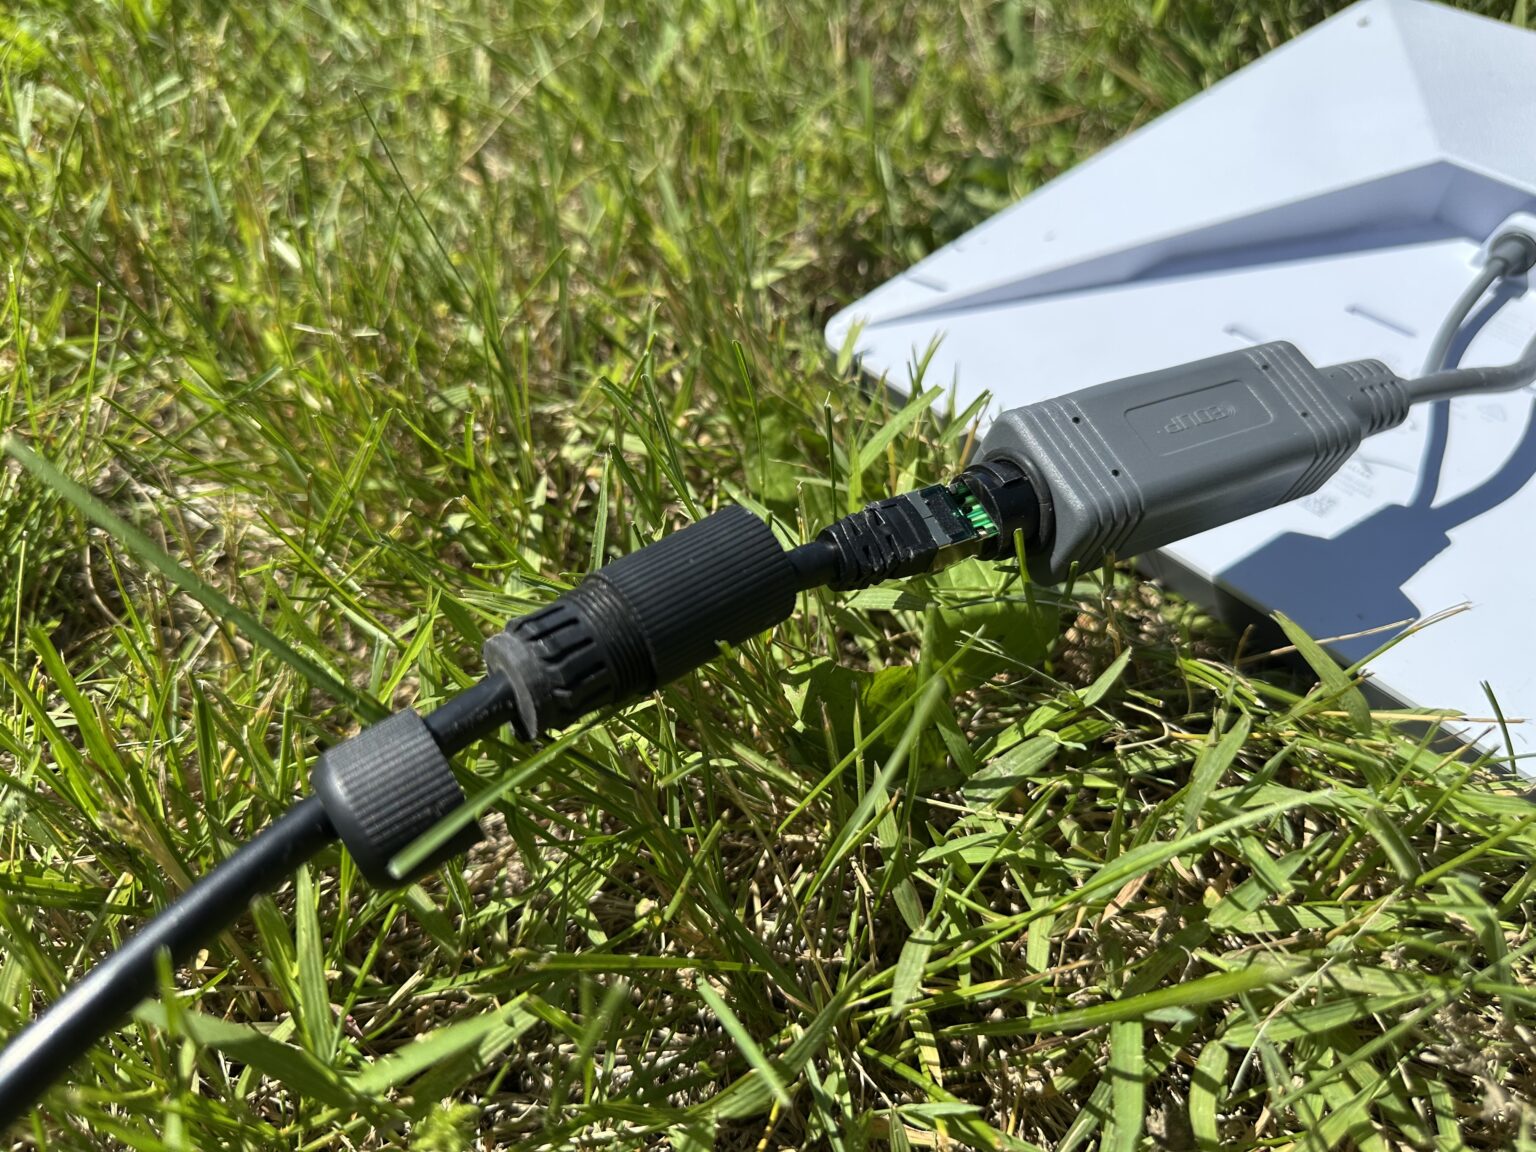
For the dish side of the Ethernet cable, grab the EDUP splitter. To install the splitter, take apart the waterproof cap. Slide the cap onto the cable, followed by the rubber cable seal and the rest of the cap assembly. Once those pieces are on the cable, plug the connector into the PoE splitter. Install the waterproof cap to create a weatherproof seal.
On the other side of the splitter, connect the DC barrel plug to the Mini’s power input port. Connect the RJ45 connector to the Mini’s Ethernet port.
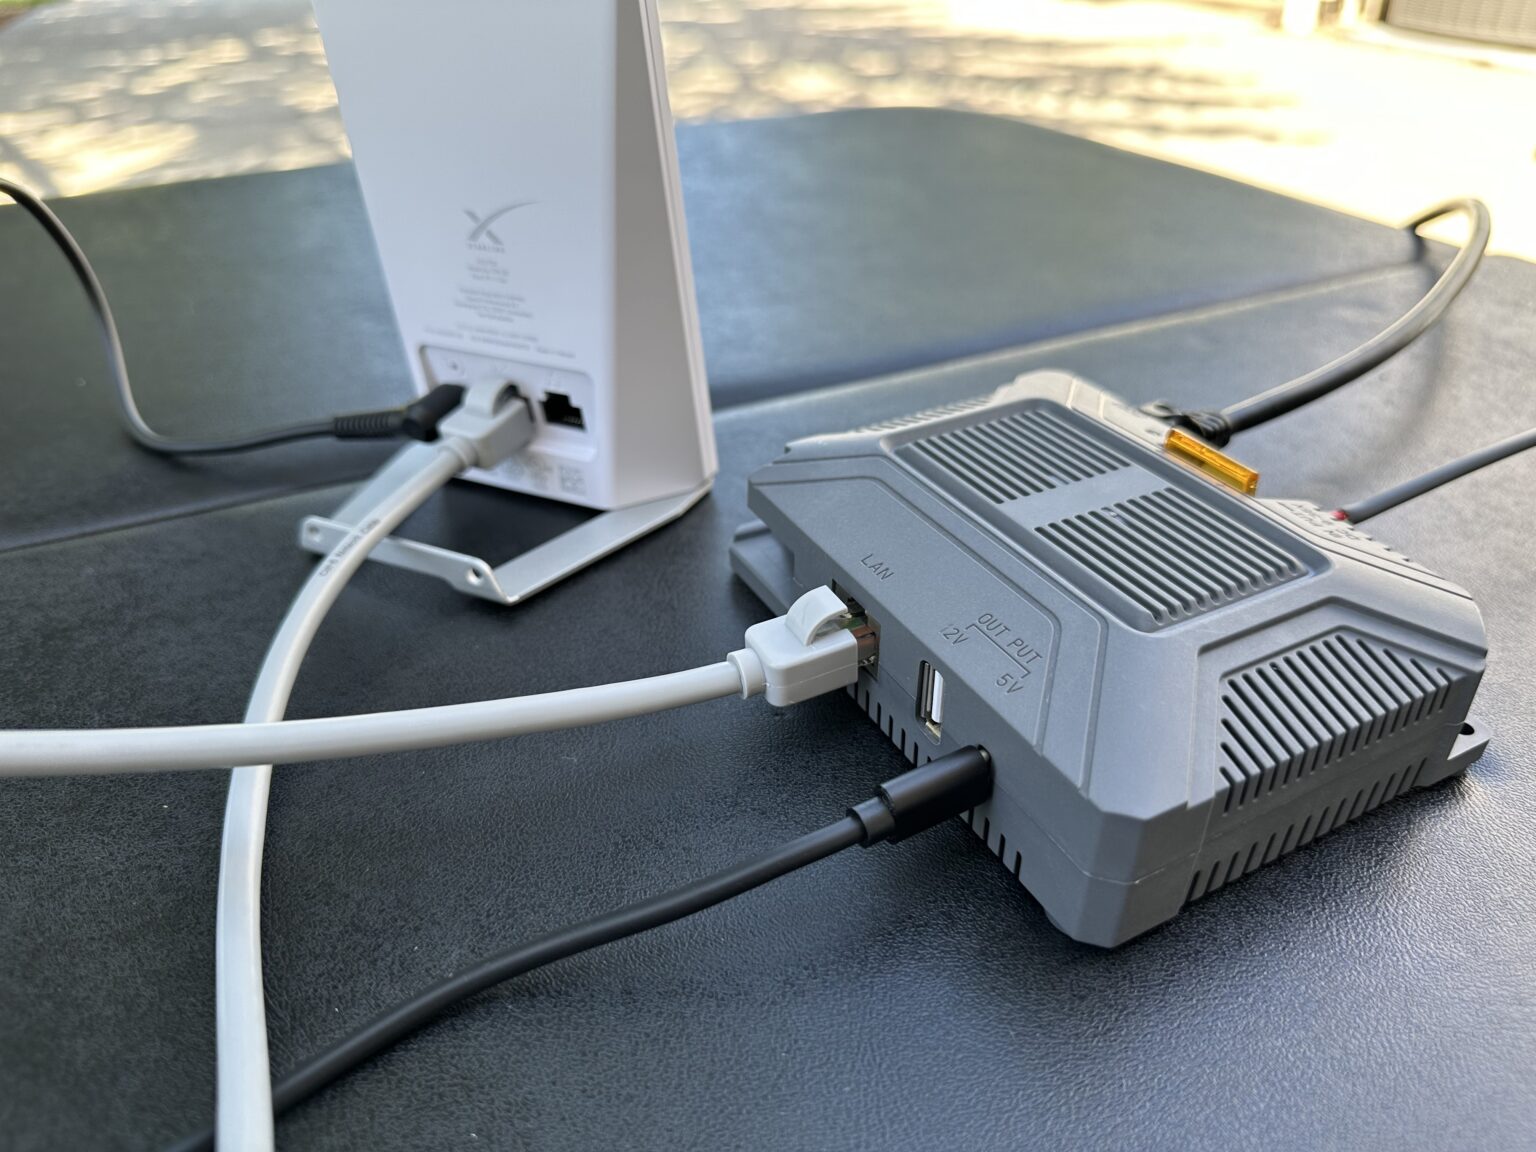
Hooking Up the Router
Now we’re ready to hook up the external router to the EDUP PoE injector. Use any kind of Ethernet cable, most 3rd party routers come with one. Connect one end to the WAN port of the router. On my Starlink Router Mini, the WAN port is the left port with the dish icon. The other end of the Ethernet cable plugs into the LAN port on the EDUP PoE injector.
The last step is to provide power to your router. Like I mentioned before, I’m just powering the Starlink Router Mini from the 5V USB-C port on the EDUP PoE injector.
Results
After everything is hooked up, apply power and give the Mini a few minutes to boot up. Since I used the Mini AC wall adapter, I just plugged that into an outlet. The EDUP PoE injector has a blue power LED to let you know it’s receiving power. A few minutes later my Mini was connected.
If you are using a 3rd party router you’ll want to put the Mini’s internal router in bypass mode. You can do that from the settings page in the Starlink app. Bypass mode turns off the Mini WiFi router so your 3rd party router can handle everything. You’ll manage your network settings from the 3rd party app or web page, but you can continue to monitor the Mini dish from the Starlink app.
Since I’m using the Router Mini wired to the Mini dish, it automatically pairs in mesh mode. That means the router in the Mini and the Router Mini form a seamless mesh network, with both routers providing coverage on the same WiFi network.
To make sure everything was working fine, I ran an internet speed test over WiFi while standing next to the Router Mini and EDUP PoE injector. I got 145 Mbps down and 14 Mbps up. That’s a typical speed test result from my Starlink Mini. I can now get full speeds over WiFi where I use my devices, even though the Mini dish is nearly 100′ away in my yard. Previously, with just the WiFi from the Mini, I would be lucky to get 1/5 of that due to the poor WiFi signal.
Video
Final Thoughts
If you’re using the Starlink Mini on a roof, and having WiFi signal issues, consider switching over to a power over Ethernet setup. This will allow you to run a single Ethernet cable between the dish and an external router installed inside.
The EDUP product I used in this project worked great, and I highly recommend checking it out. It adds PoE functionality to the only Starlink dish that doesn’t have it. With PoE you can send both power and data over one cable, simplifying your installation.
I’d love to hear your thoughts and questions on this project, so leave a comment below!
Nice setup and video!
We are considering this solution for our Airstream, but I prefer to keep the original Starlink Mini power supply. Can you recommend an alternative power supply?
Initially I ordered the AC unit from Edup, but it is very noisy and gets too warm in the media cabinet.
Can’t you use the POE power from a Starlink Standard Gen 3 router, a Starlink cable to the Splitter to supply power and use the Starlink Standard Gen3 router indoors as your access point?
Just curious if this setup would work with Gen 3 Standard without the splitter of course? I happen to have both Gen 3 and Mini.
Loved your video/blog. I have a 2024 Airstream and want to stream football, handle email, and search internet but no business or gaming. 99% of the time I will have shore power. I want to order your whole set up but concerned whether mini router can handle the internet searching. Will the TV be able to grab the Ethernet signal directly from the router through the HDMI/Ethernet “Bring Your Own Device” port or does it rely on the mini router?
Sorry, not too techy. Thanks, Steve
Colby. I have a gen3 dish I am installing on a high rise condo. I need about 300’ of cable. I know Starlink says they can only go 150 without losing power or signal. Is there a way to put a Poe booster or amplifier between the 2- 150 ‘ cables or use a cat 6 cable with rj45 ends. Any other suggestions? Do you know what voltage is need for the dish that runs thru the cables? Or is there some company that makes longer cables 300’ that are heavier gauge that would carry the signal and power
I would recommend installing the Gen 3 power supply and router somewhere in between, and then running an Ethernet cable from one of the LAN ports the rest of the way. A Starlink 300′ cable from the dish to the power supply/router isn’t going to work.
Hi. I configured this setup in my small camper, with a 3rd party router, and connected them both via on/off switches directly to my battery. It works perfectly.
Here’s a question. Let’s say I’m at a campground with power (standard electrical outlet) and I want to plug my Starlink into an outlet. I’m thinking I could unhook the power portion of the power/ethernet adapter from the antenna, and connect the original Starlink power cable to it, and the other end to the outlet using the Starlink ac adapter. Would I need to disconnect the Ethernet cable as well, and connect an Ethernet cable from the antenna to my router? (because it’s POE) Or would the adapter-Ethernet connection still work as before? Would the EDUP send power through the Ethernet cable even though it’s only being used for data? I realize my router would still be using power from my battery but it’s such a small draw, I don’t think it would matter much. Unless of course there would be a power draw through the POE Ethernet connection? I guess I could also plug my router into the outlet instead of having it stay connected to the battery? Beginning to sound like a hassle.😐 Thanks.
Do you have a charger for the battery for when you are plugged in at the campground? That would be the easiest solution, in my opinion. The Mini would still be running off the battery, so no modifications needed. But it wouldn’t matter since the charger that is plugged in to shore power supplies all the power needed to keep the battery charged.
Otherwise I’m not 100% on whether the data part of the system continues to operate without POE power applied. It should, but I don’t know for sure as I haven’t tested it.
Thanks for reply! Yes, I do have an on board charger and thought about that solution as well. I’m sure that would work.
I did test out my idea. I plugged Starlink cable into antenna and AC outlet. I turned off EDUP but kept my router turned on. It worked! But why? I’m guessing the power to the antenna allows it to communicate with satellites and generate the data signal which is sent via Ethernet cable to the router. The data signal must not require any power from the EDUP device…it just acts as a junction between the data going in and out to router? So it doesn’t matter, in terms of data signal, whether the EDUP is on or off?
Please call me? I have questions about my service…
Is the splitter available for purchase separately and will it work with other PoE injectors or PoE ports on a router?
Here is one: thttps://mobilemusthave.com/products/poe-splitter-for-starlink-mini-1
I’m not sure if it works with other POE systems.
So close!
This is great writeup and review. Thanks so much. What would be even better yet is a dual-port PoE solution and additional splitter for the Router Mini portion of the equation. Seems silly to solve the two-wire problem on the mini, but not on the router also.
Thoughts about products out there that might be able to do this? I understand the Starlink PoE standards are not the same as existing PoE standards…?
Zolo
I’m a South African living in a rural area I need this starlink, how much will it cost me monthly???
You can visit http://www.Starlink.com and type in your address. It will show pricing for your area.
Can I use a third-party LAN cable?
Yep! Doesn’t need to be anything special, any CAT5 or above Ethernet cable will work fine.
So, I’m thinking I can connect the Edup directly to my 12v battery and not need the 12-48 converter I installed for my Gen 2 actuated when I converted that to run on 12 volt. Is that correct? And, if desired, I could put a switch on the power line (Edup to battery) to turn it off and on, correct?
And to power the 3rd party router, I can use a usb-c cord from Edup to router. This means that the router needs a usb-c power input, or, I could use a usb-c to barrel connector if that’s what the router requires for power. Correct?
And finally, does the usb-c cord need to have a specific capacity of some kind? Like minimum watts etc.?
Many thanks for your great articles and website. I’ve been a reader for several years.
Correct on all counts. The EDUP unit accepts 12V no problem, and will perform the step up to 48V. Also correct on the DC switch to turn it on and off. For USB-C power, most routers only use 5-10 watts max, so the rating of the USB-C adapter cable you use isn’t all that important. You can buy USB-C to whatever type of port your router has. In my case, it was the DC35135 plug on the Router Mini, and I had no problem just searching “DC35135 to USB-C” on Amazon to get a number of options.
You’re welcome, and thanks for continuing to support the blog!
Can we use it in our region East Africa?
I don’t see why not, as long as you can get the Mini and have the Amazon product shipped there.
I have been using this setup for a few weeks now. My requirements are beyond the simple router in the mini and I didn’t want to have to run two wires to it. I bought the heaviest guage ethernet cable to minimize the voltage drop to the dish. Unfortunately, the cable is too big to fit through the weatherproof cap on the combiner that attaches to the dish. It’s been through a couple of heavy rains without a problem.
Here are the cables I used (https://amzn.to/443Pii1). It may be overkill. I may try a standard ethernet cable to see if it works. On the plus side I don’t need the power brick and can power the router (GL.iNet BE3600) from it. I have a mini PC that uses a USB-C connector, but the power supply didn’t like it.
This would be an even greater solution if Starlink made the ethernet plug accept power in addition to the power jack. Not a great expense to them and a huge improvement. At least it doesn’t use the screwy plugs like the Gen2 unit had.