Starlink Router Mini Review: Tiny $40 Mesh WiFi Router
The Router Mini is a tiny mesh WiFi router from Starlink. I test the speed, range, and show you how to set up a Starlink mesh network in this review.
We all have stubborn WiFi dead zones in our homes. Maybe it’s a corner room on the top floor, or perhaps a detached garage. If you’re a Starlink customer looking to expand your WiFi coverage, there is a new accessory from Starlink called the Router Mini. The Router Mini is a tiny $40 mesh WiFi router that can pair wirelessly with your existing Starlink system.
I put the Router Mini through a range of tests, including using it as my main Starlink router for several days. In this review, learn all about my experience using the Router Mini and Starlink mesh. I’ll be covering the features, specs, and setup process. I’ll also compare it to the Gen 3 Mesh Router.
Overview
The Router Mini is a compact mesh WiFi router. It’s designed to extend your WiFi coverage by pairing with your existing Starlink router. The Router Mini can be paired via a wired or wireless connection, creating a seamless mesh WiFi network for improved coverage and performance for all of your devices.
At just $40, the Router Mini is an incredible value. You can buy them directly from Starlink, but they are also available on Amazon for the same price. It’s in the price range of 3rd party WiFi boosters and extenders, but offers much better performance thanks to its mesh capability. With mesh WiFi, all the routers (mesh nodes) talk to each other, creating one seamless network throughout your entire home. The main router handles all of the connections, ensuring optimal performance and seamless hand offs for each device connected to the mesh network.
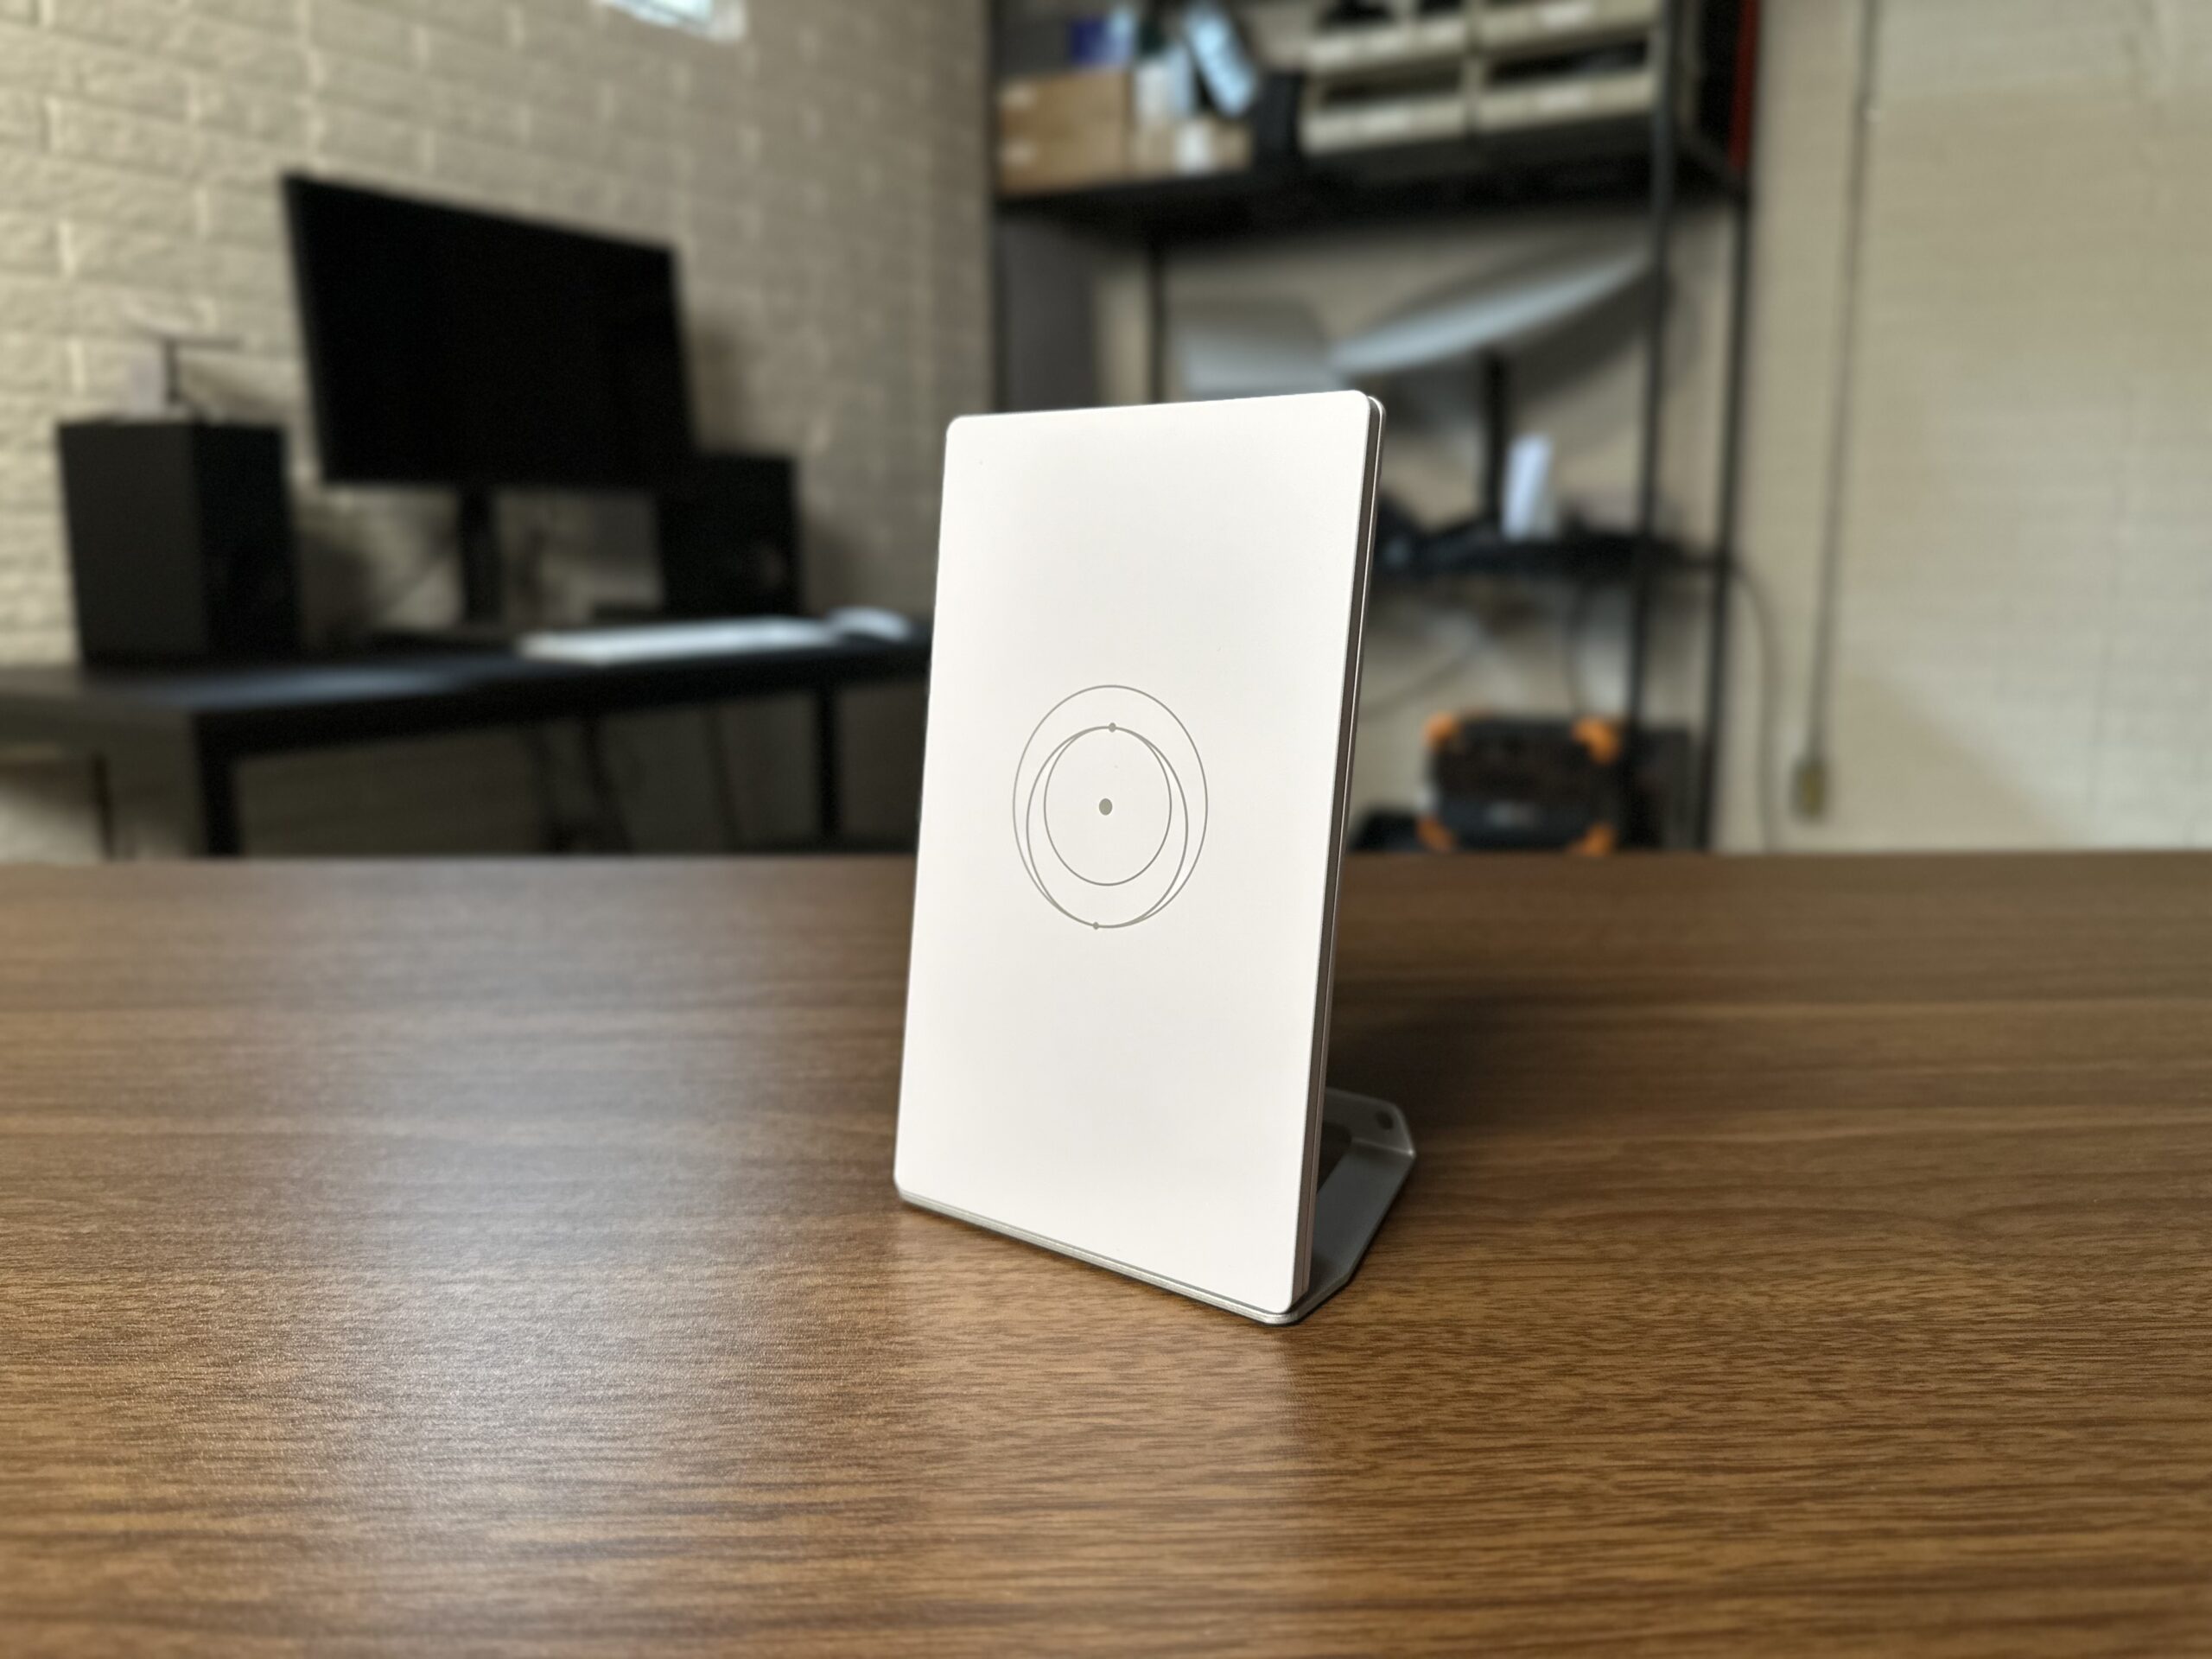
The Router Mini is a dual-band WiFi 6 router, measuring just 5.4” x 3.3” x 1” (138 x 83.6 x 27 mm). It’s about the same size as my iPhone 14. But don’t let the size fool you, Starlink says it can cover up to 1,300 sq ft. That makes it perfect for adding additional WiFi coverage in a home or RV.
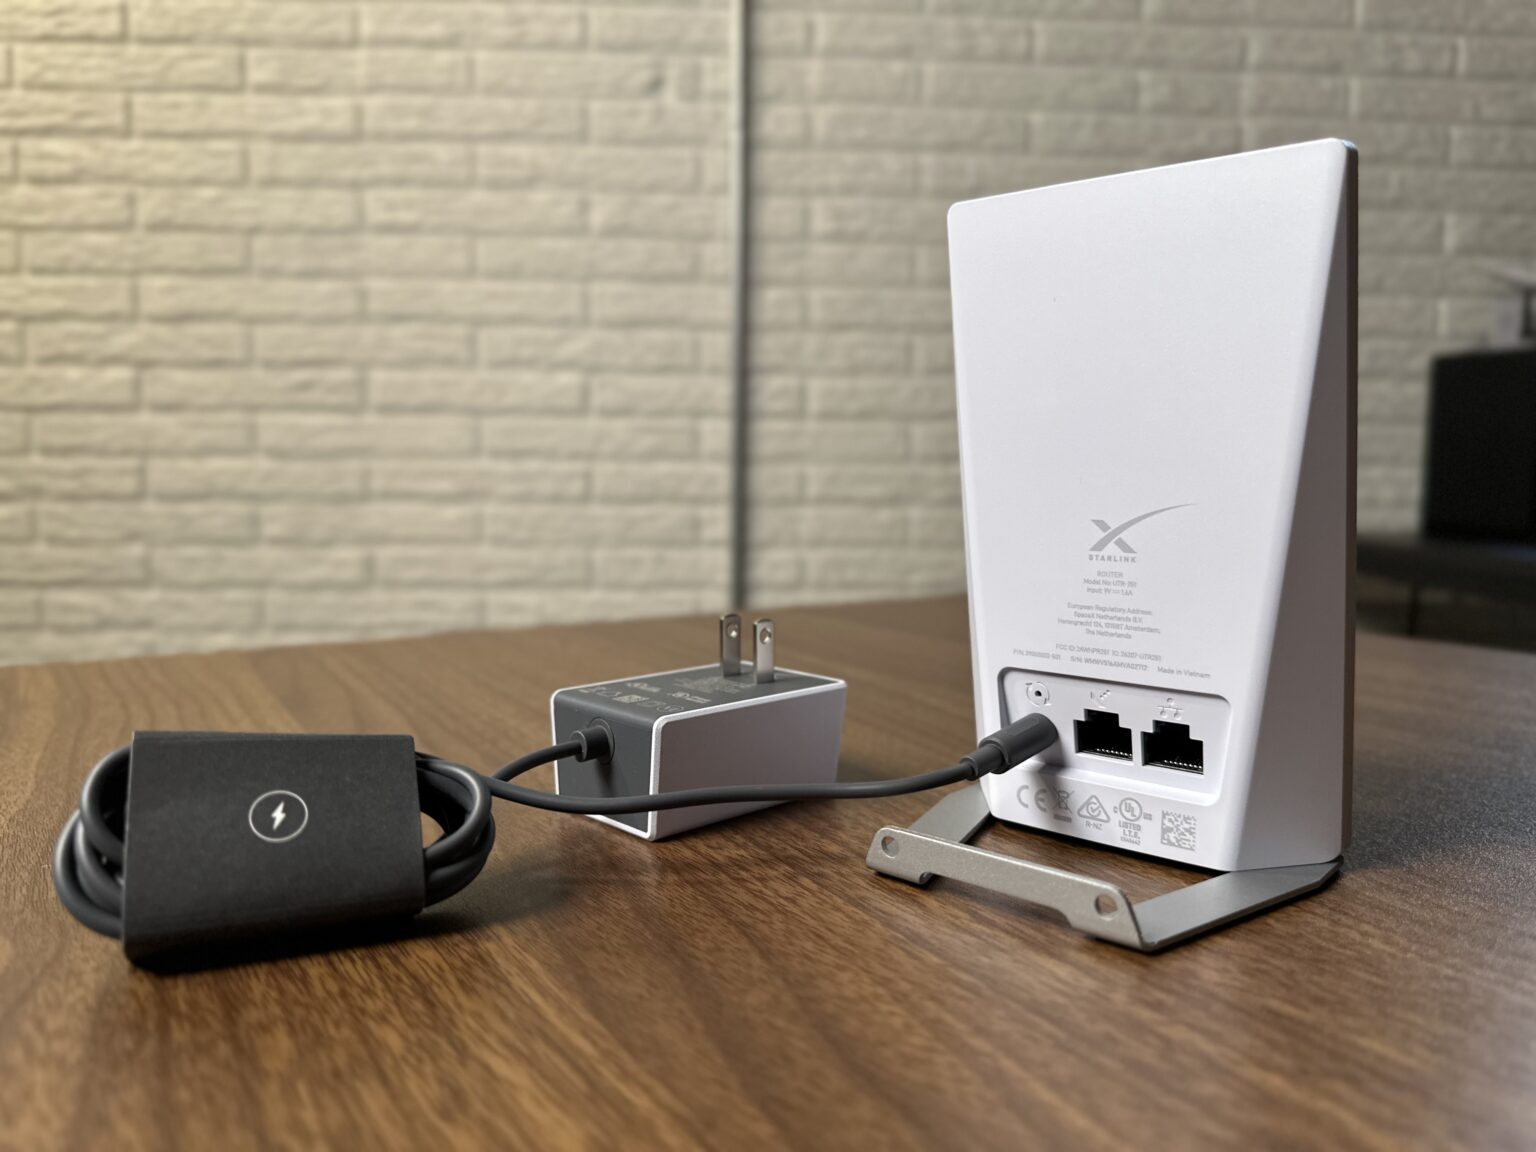
On the front you’ll find the familiar Starlink logo and a status LED. On the back there are two Ethernet ports, a power input port, and a factory reset button. An AC wall adapter and metal stand are included in the box with the Router Mini. The stand attaches to the bottom of the router, and can be wall mounted with the included hardware.
Compatibility
The Router Mini is compatible with all Starlink routers except for the original Gen 1 router, which does not have mesh support. If you have a Gen 2, Gen 3, or Mini dish, you’ll be able to pair the Router Mini with a wired or wireless mesh connection. In mesh mode the Router Mini seamlessly integrates with your other Starlink routers, extending WiFi coverage as needed in your home.
The Router Mini isn’t compatible with 3rd party mesh systems.
The Router Mini can also serve as a main Starlink router with a wired connection and bypass mode turned on. For example, if you have a Starlink Mini dish mounted on top of your RV, you might want to use the Router Mini as the main router. You could mount it inside where you want the best signal. It’s worth noting that the Router Mini doesn’t have PoE (power over Ethernet) functionality, so it can’t send any power to a Starlink antenna. It’s just a router, and it won’t replace the PoE functionality of a Gen 2 or Gen 3 router.
There isn’t a limit on the number of Starlink mesh nodes you can have on your system, but Starlink recommends no more than three additional mesh nodes for optimal performance.
Setting Up Starlink Mesh
One of the best parts about using Starlink mesh is how easy it is to set up. There are two ways to pair the Router Mini to your Starlink network, wired or wireless. A wired mesh connection is the best because you’ll get maximum performance between the Router Mini and your main Starlink router. But not everyone has the ability to run Ethernet cable, so you can also establish a wireless mesh connection.
Wired Mesh
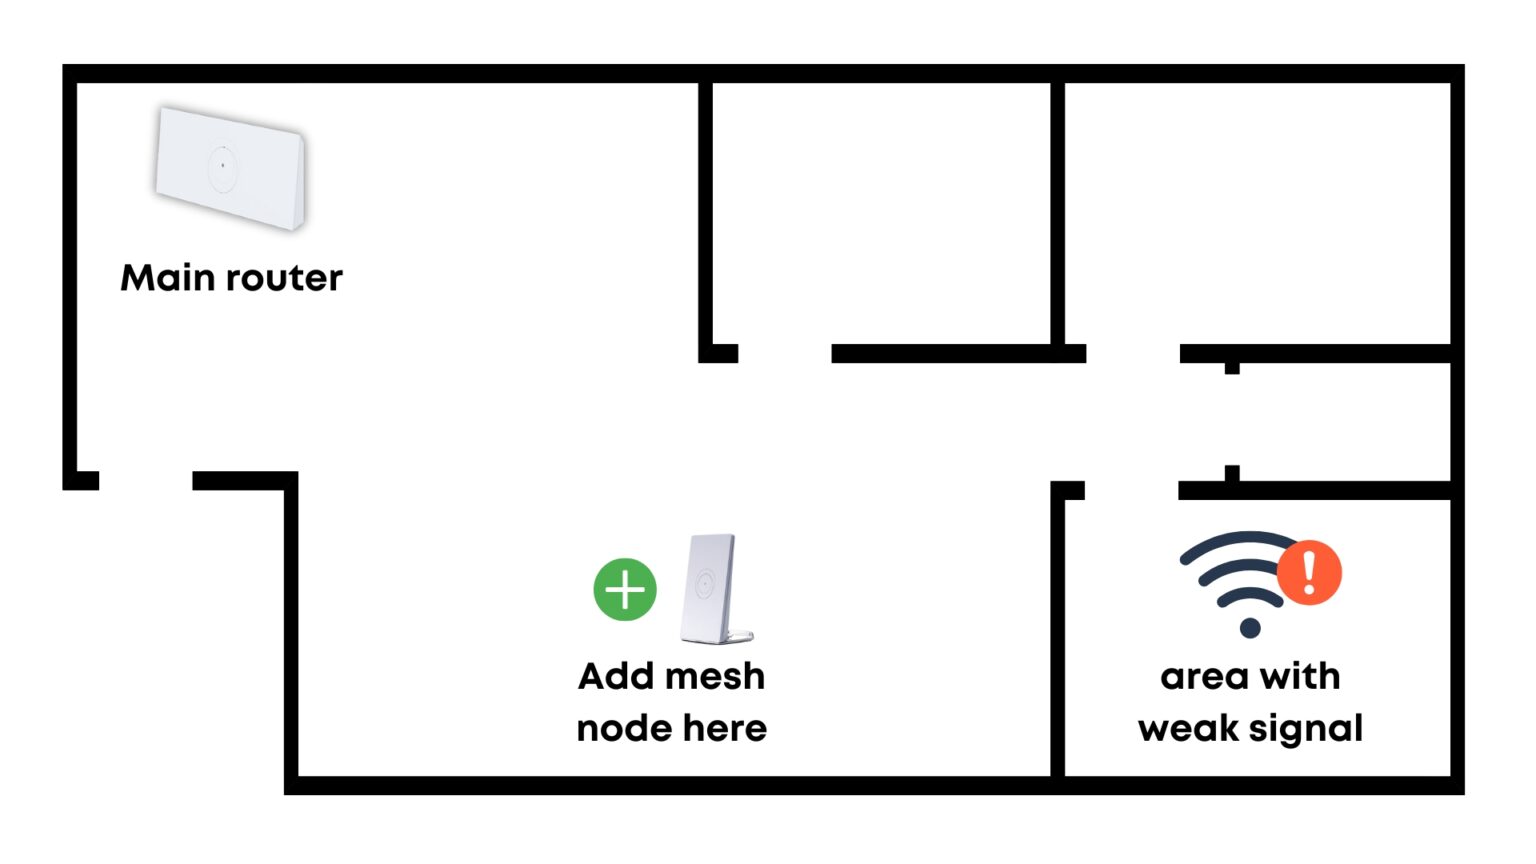
To set up a wired mesh connection you’ll need an Ethernet cable run between your main Starlink router and the Router Mini. Place the Router Mini in the area where you are trying to improve WiFi coverage.
Plug in one end of the Ethernet cable to the LAN port on the main Starlink router. Plug the other end of the cable into the WAN port (left port if looking at the back) of the Router Mini. Plug in the AC wall adapter and allow the Router Mini a few minutes to boot up.
Open the Starlink app and you should see the additional mesh node on your network. With a wired connection, mesh pairing is automatic, no additional configuration is needed. If you go into the network settings in the app you can configure a name for your Router Mini, and check which devices are connecting to it.
You can daisy chain additional mesh nodes with a wired connection. Connect an Ethernet cable from the LAN port (right) on the back of the first Router Mini to the WAN port (left) on the next Router Mini.
Wireless Mesh
If you can’t run Ethernet cable, don’t worry, the Router Mini also supports wireless mesh pairing. It can talk to the main Starlink router over WiFi, allowing you to easily expand coverage in your home.
Mesh node placement is key for wireless mesh performance. You should aim to install the Router Mini about halfway between your main Starlink router and the area where you want to improve WiFi coverage. Ideally you should pick an open area, placing the Router Mini on a shelf to get it off the ground. You don’t want to just place the Router Mini in a WiFi dead zone, as it’s a WiFi device itself. A wireless mesh node is only as good as its signal from the main router.
To pair the Router Mini to the main router, plug in the AC wall adapter. Give it a few minutes to boot up, then open up the Starlink app. You should see a pairing request pop up. Tap Pair. If you don’t see a pair request, go into Network, then tap Nodes. You should pending, paired, and blocked mesh nodes.
If you tap on a mesh node you can see additional information. Give it a custom name, see which devices are connected, and view connection performance to the main router. You’ll also find an option to block a paired mesh node if you ever need to remove one from your system.
I don’t want to cover mesh in too much detail in this review, so if you need additional info, check out my full Starlink Mesh Tutorial.
Speed & Range Tests
I had a few ideas on how I wanted to test the performance of the Router Mini. I decided to put it to the ultimate test. I have a Starlink Gen 3 Standard system that I use for home internet. I hooked up the Router Mini to my Gen 3 router via Ethernet, and then put the Gen 3 router into bypass mode. In this configuration the Router Mini is acting as the main WiFi router for my entire home. I don’t have any additional Starlink mesh routers.
That’s a tall order for the Router Mini. Starlink says it can cover up to 1,300 sq ft, and my house is well over that. I have a basement studio, main floor, and upper floor with an office. It’s a bit over 2,000 sq ft in total. To make things even more difficult, I have the Starlink cable routed into my basement to a network closet. The placement of the Router Mini wasn’t optimal at all, and putting the main WiFi router in a corner in the basement is probably the worst place for it! But that’s the test, how much can the Router Mini really cover?
Baseline Internet Speed Over WiFi
The first test I ran was an internet speed test over WiFi, using the speed test built in to the Starlink app. For this test, my phone was only a few feet away from the Router Mini, so this is the best case scenario for WiFi. This test is a baseline for all of the other testing, just to give an idea of the max WiFi performance when my phone has the best signal possible.
Download: 425 Mbps | Upload: 24 Mbps
Living Room
So the Router Mini delivers full internet speeds over WiFi when you are close to the router. Nothing groundbreaking there, but I had to establish a baseline. Next, I moved up a floor to my main level. The living room is where I spend a lot of time on devices, so it’s important to have good WiFi performance. My living room is located directly above where the Router Mini is installed, so it’s only about 15 feet away vertically. But the signal has to pass through the floor, so let’s see how it does.
Download: 316 Mbps | Upload: 21 Mbps
The WiFi internet speed was a little less than baseline, but I chalk that up to the inconsistencies of internet speed testing. I also ran the phone to router test in the advanced menu of the Starlink speed test, and achieved nearly full throughput. In other words, my WiFi signal in the living room isn’t limiting my internet speeds.
Dining Room
Next, I ran a speed test from my dining room, which is the farthest area away from the Router Mini on the main floor. It’s probably 40-50 feet horizontally away from the Router Mini, and up one floor. This is where I would expect to see a weaker WiFi signal, but my phone remained connected, and this is what I scored on the speed test:
Download: 200 Mbps | Upload: 19 Mbps
I also ran the phone to router test and confirmed that the lower speeds were caused by a weaker WiFi signal. At this distance I am not able to get full internet speeds from the Router Mini. That is to be expected, and 200 Mbps down is still more than enough. But as I move farther from the Router Mini, I will continue to see reduced WiFi performance.
Upstairs Office
To demonstrate the limits of the Router Mini, I headed upstairs to the top level of my home. There’s an office that is located the farthest away from the Router Mini, both horizontally and vertically. This is the worst case scenario for a WiFi signal in my home. What can the Router Mini deliver?
Download: 109 Mbps | Upload: 25 Mbps
To my surprise, my phone stayed connected to the Router Mini, but just barely. I was shocked when I got over 100 Mbps down on the internet speed test. Although the weak WiFi signal is bottle-necking my internet speeds, the fact that I’m able to get this kind of performance at this distance is impressive for a $40 WiFi router. I could still use devices in the upstairs office, but obviously I wouldn’t get optimal performance over WiFi.
The takeaway for me was that the Router Mini managed to cover every corner of my 2,000 sq ft home, even though it’s only rated to cover 1,300 sq ft. That means the Router Mini delivers incredible value. It’s more than capable of extending your WiFi coverage as a mesh node, since I’ve demonstrated it’s capabilities as the main router in my home.
Router Mini vs Gen 3 Mesh Router
If you’re wanting to add a Starlink mesh router to your network, you have a choice between the compact Router Mini and the more powerful Gen 3 Mesh Router. Both can pair via a wired or wireless mesh connection, and both are super simple to set up. But what are the main differences, and which is best for you?

The biggest difference is price. The Router Mini is an incredible deal at $40, while the Gen 3 router is much more expensive at $120. But you get what you pay for. The Gen 3 router has tri-band mesh vs dual-band on the Router Mini. It’s able to cover 3,200 sq ft vs the Router Mini’s 1,300 sq ft.
In my opinion, the Gen 3 Mesh Router is best for larger homes, or homes with lots of devices using WiFi simultaneously. The Gen 3 router has better mesh performance and nearly 3x the Wifi coverage. If you’re pairing your mesh nodes wirelessly, the Gen 3 router is going to be your best bet with its tri-band mesh.
The Router Mini is an affordable mesh router for adding WiFi coverage to smaller areas. If you don’t need to cover a large area, perhaps just a few rooms, the Router Mini can easily do that for just $40. If WiFi speeds aren’t your top priority, and you’re just trying to get a signal to outdoor cameras or other low bandwidth devices, the Router Mini offers incredible value.
Video
This post may contain affiliate links. See our policy to learn more.
Problems With The Router Mini
Overall, the Router Mini exceeded my expectations, but that doesn’t mean it doesn’t have issues. The low $40 price tag certainly softens the downsides, but they are still there. The two main issues I have with the Router Mini are the lack of configuration options and the power input rating.
Regarding the lack of configuration options, this is an issue with all Starlink routers. They’re very basic in terms of network options. For example, you can’t forward ports, configure firewall rules, or assign static IP’s to your devices. That’s fine for most customers, but some people want advanced features that the Router Mini doesn’t offer.
My other issue is the power input rating of the Router Mini. The port on the back is a DC35135 DC barrel plug, powered by the AC wall adapter. The wall adapter converts AC power to 9V DC. I wish they would have made it 12V instead of 9V. Many of you will want to use the Router Mini in an RV or van, powered by a 12V battery system. Although I did test the Router Mini at 5V, 9V, and 12V (they all worked), I can’t really recommend you stray from the Starlink specs on the input voltage.
In my opinion, the best way to power the Router Mini is to use a USB-C port, which should have the correct 9V PD profile to satisfy the 9V input rating. I used this cable from Amazon, but if you search for “DC35135 to USB-C” you can find a range of cable options.
Final Thoughts

After all my testing with the Router Mini, I can easily recommend it to anyone seeking an affordable solution to extend WiFi coverage in a home or RV. It exceeded my expectations in just about every category. It covered more space that I thought it would, it’s tiny and compact, fits into any decor, and easily pairs with any Starlink system with the tap of a button.
I still recommend the Gen 3 Mesh Router for larger and busier areas, but the Router Mini is perfect for smaller areas. In my opinion, it makes WiFi extenders and boosters obsolete. Why sacrifice performance when you can spend a few more dollars and get a proper mesh WiFi router to add to your system?
I’d love to hear your thoughts on my review. How do you see yourself using the Router Mini?
Hi Colby,
That was a good review to read. Is it possible to use two mini routers or not. We have a generation three router.
We live in a large Bungalow and there are two spots furthest away from the router that can be a problem. We live on the Isle Of Man U.K. Thank you.
Les Netherwood.
Yes, Starlink says you can have up to 3 additional mesh routers added to your system. You can daisy chain them via Ethernet from one node to another, or just wirelessly connect them back to the main router.
Thanks very much with information I really appreciate as a I.T Tech I’m well impressed with the information and learn a lot out this.
Hello Colby! Thanks for your review of the Starlink $40 mini mesh router. You mentioned that the required voltage is 9 VDC, but the Amazon link for a USB-C to 3.5 x 1.35mm plug provides 12 VDC, per their listing. Any thoughts on finding a 9 VDC output cable?
The linked cable doesn’t convert voltages so it just delivers the voltage right from the source you are plugged into. For example, I tried it off of a 5V USB-C port as well as a 12V USB-C port, both worked fine. The cable is just rated at 12V, it can output whatever voltage the source is delivering.
I recently installed the mini router , which set up was quick and easy. About an hour after I set it up I passed by it and noticed power indication light was off. I checked Starlink ap and it showed that everything was connected and working. This morning I contacted Starlink and explained situation. They said to unplug power cord then plug it back in. After doing this light came back on so they say problem solved. About 20 minutes later I checked and light was off , checked ap and it was showing everything was connected and working. I was wondering if this is how mini router worked , and light just initially works after powering up and then goes out. Starlink folks did not mention anything during my inquiry about this thought . Did you notice anything like this during your testing of mini router? Thanks…
The status light will turn off automatically after some time, totally normal. The Gen 3 router LED light does the same thing.
Thanks Colby for the quick reply…
Great review as always. Thanks for helping/leading the Starlink community.
So. Do I. Need. To use this $40 device sounds fantastic as we’re lagging. I pay 158 a month. But last year I had the $ 140 deal. I’m also disabled senior. it s exciting thanks
Where do I buy one of these?
Starlink shop on the website or in the app.
What size ethernet cable do i use to run out to my shop . How do i purchase a starlink mini the run to my shop is around 130’
From what I’m reading. I have no clue. Of. Size name anything like that.
How do I put my dish on winter vacation ?
I’d like to turn my dish off. Now til April 30 2026
How do I put my dish on winter vacation ?
My Starlink Mini Router seems to get quite hot. Also, the status light has been going off. I see in your comments above that this is normal, so I’ll stop worrying about that, but still concerned about how warm the router gets. Is this normal? Thanks.
Hi Colby,
Sometime back I emailed you regarding SONOS not working on my Gen 2 Router, at that time you had no direct knowledge of the issue. To get my existing SONOS network working I set my Gen 2 Router to Bypass and connected, using the Starlink Ethernet Adaptor, to the WAN Port of my tpLink AX1800 Router, SONOS issue solved. The tpLink now provides all my wi-fi connectivity.
I was wondering, given your knowledge of, and access to, the Starlink product range, if it wouldn’t be possible for you to borrow a SONOS device, a single Play 1 would suffice, to test the latest Starlink Routers to see if the SONOS issue has been fixed in them. Perhaps you have a more direct path to Starlink TS then I do as a standard residential customer.
Like you I have a large house on multiple levels with outlying sheds. My current thoughts are that I will purchase a Gen 3, Tri-band, Router and use my existing Gen 2 as a Mesh Point + fill-in any gaps with Router Mini’s, both wired and unwired. If my SONOS devices failed to work, then I would connect my tpLink Router using one of the Gen 3’s ethernet ports. Whilst I’m, almost, sure that this will work, I would prefer, from a minimalist POV, not to have to resort to this.
Loved the tutorials, keep up the great work.
Cheers
Danny