Starlink Ridgeline Mount Kit – Installation and Review
The Starlink Ridgeline Mount is a roof mount that doesn’t require drilling holes. I install it and give you my impressions in this review.

The roof of a home is usually the best place to mount Starlink, but not everyone wants to drill holes. If that’s your situation, I recommend the Starlink Ridgeline Mount Kit. It’s a non-penetrating roof mount designed to straddle the ridge.
I’ve been using Starlink’s Ridgeline Mount for years. They’ve offered a version for each Starlink antenna generation. The Ridgeline Mount is now in its third iteration for the Gen 3 Standard Starlink dish. That’s the one I’m reviewing in this post, but everything here will apply to previous versions as well if you have an older Starlink.
Where To Buy
I bought the Starlink Ridgeline Mount Kit directly from Starlink for $300. You’ll find it in the online shop if you already have a Starlink account. If you aren’t a customer yet, you’ll be able to purchase accessories after you order the Starlink equipment and create an account.
Availability varies by country, so the Ridgeline Mount isn’t available in every market. Log in to the Starlink shop to check on your own account. If you don’t see it listed with the other Gen 3 Standard accessories, it might not be available in your country. Don’t worry, check out this aftermarket alternative if you can’t get the Starlink version.
Overview and Features
The Ridgeline Mount is a versatile option for people who don’t want to drill holes in their roof. The mount works by weighing the dish down so that it can’t move. No fasteners are required to secure it to the roof. The kit includes four ballasts that weigh around 11 pounds each.
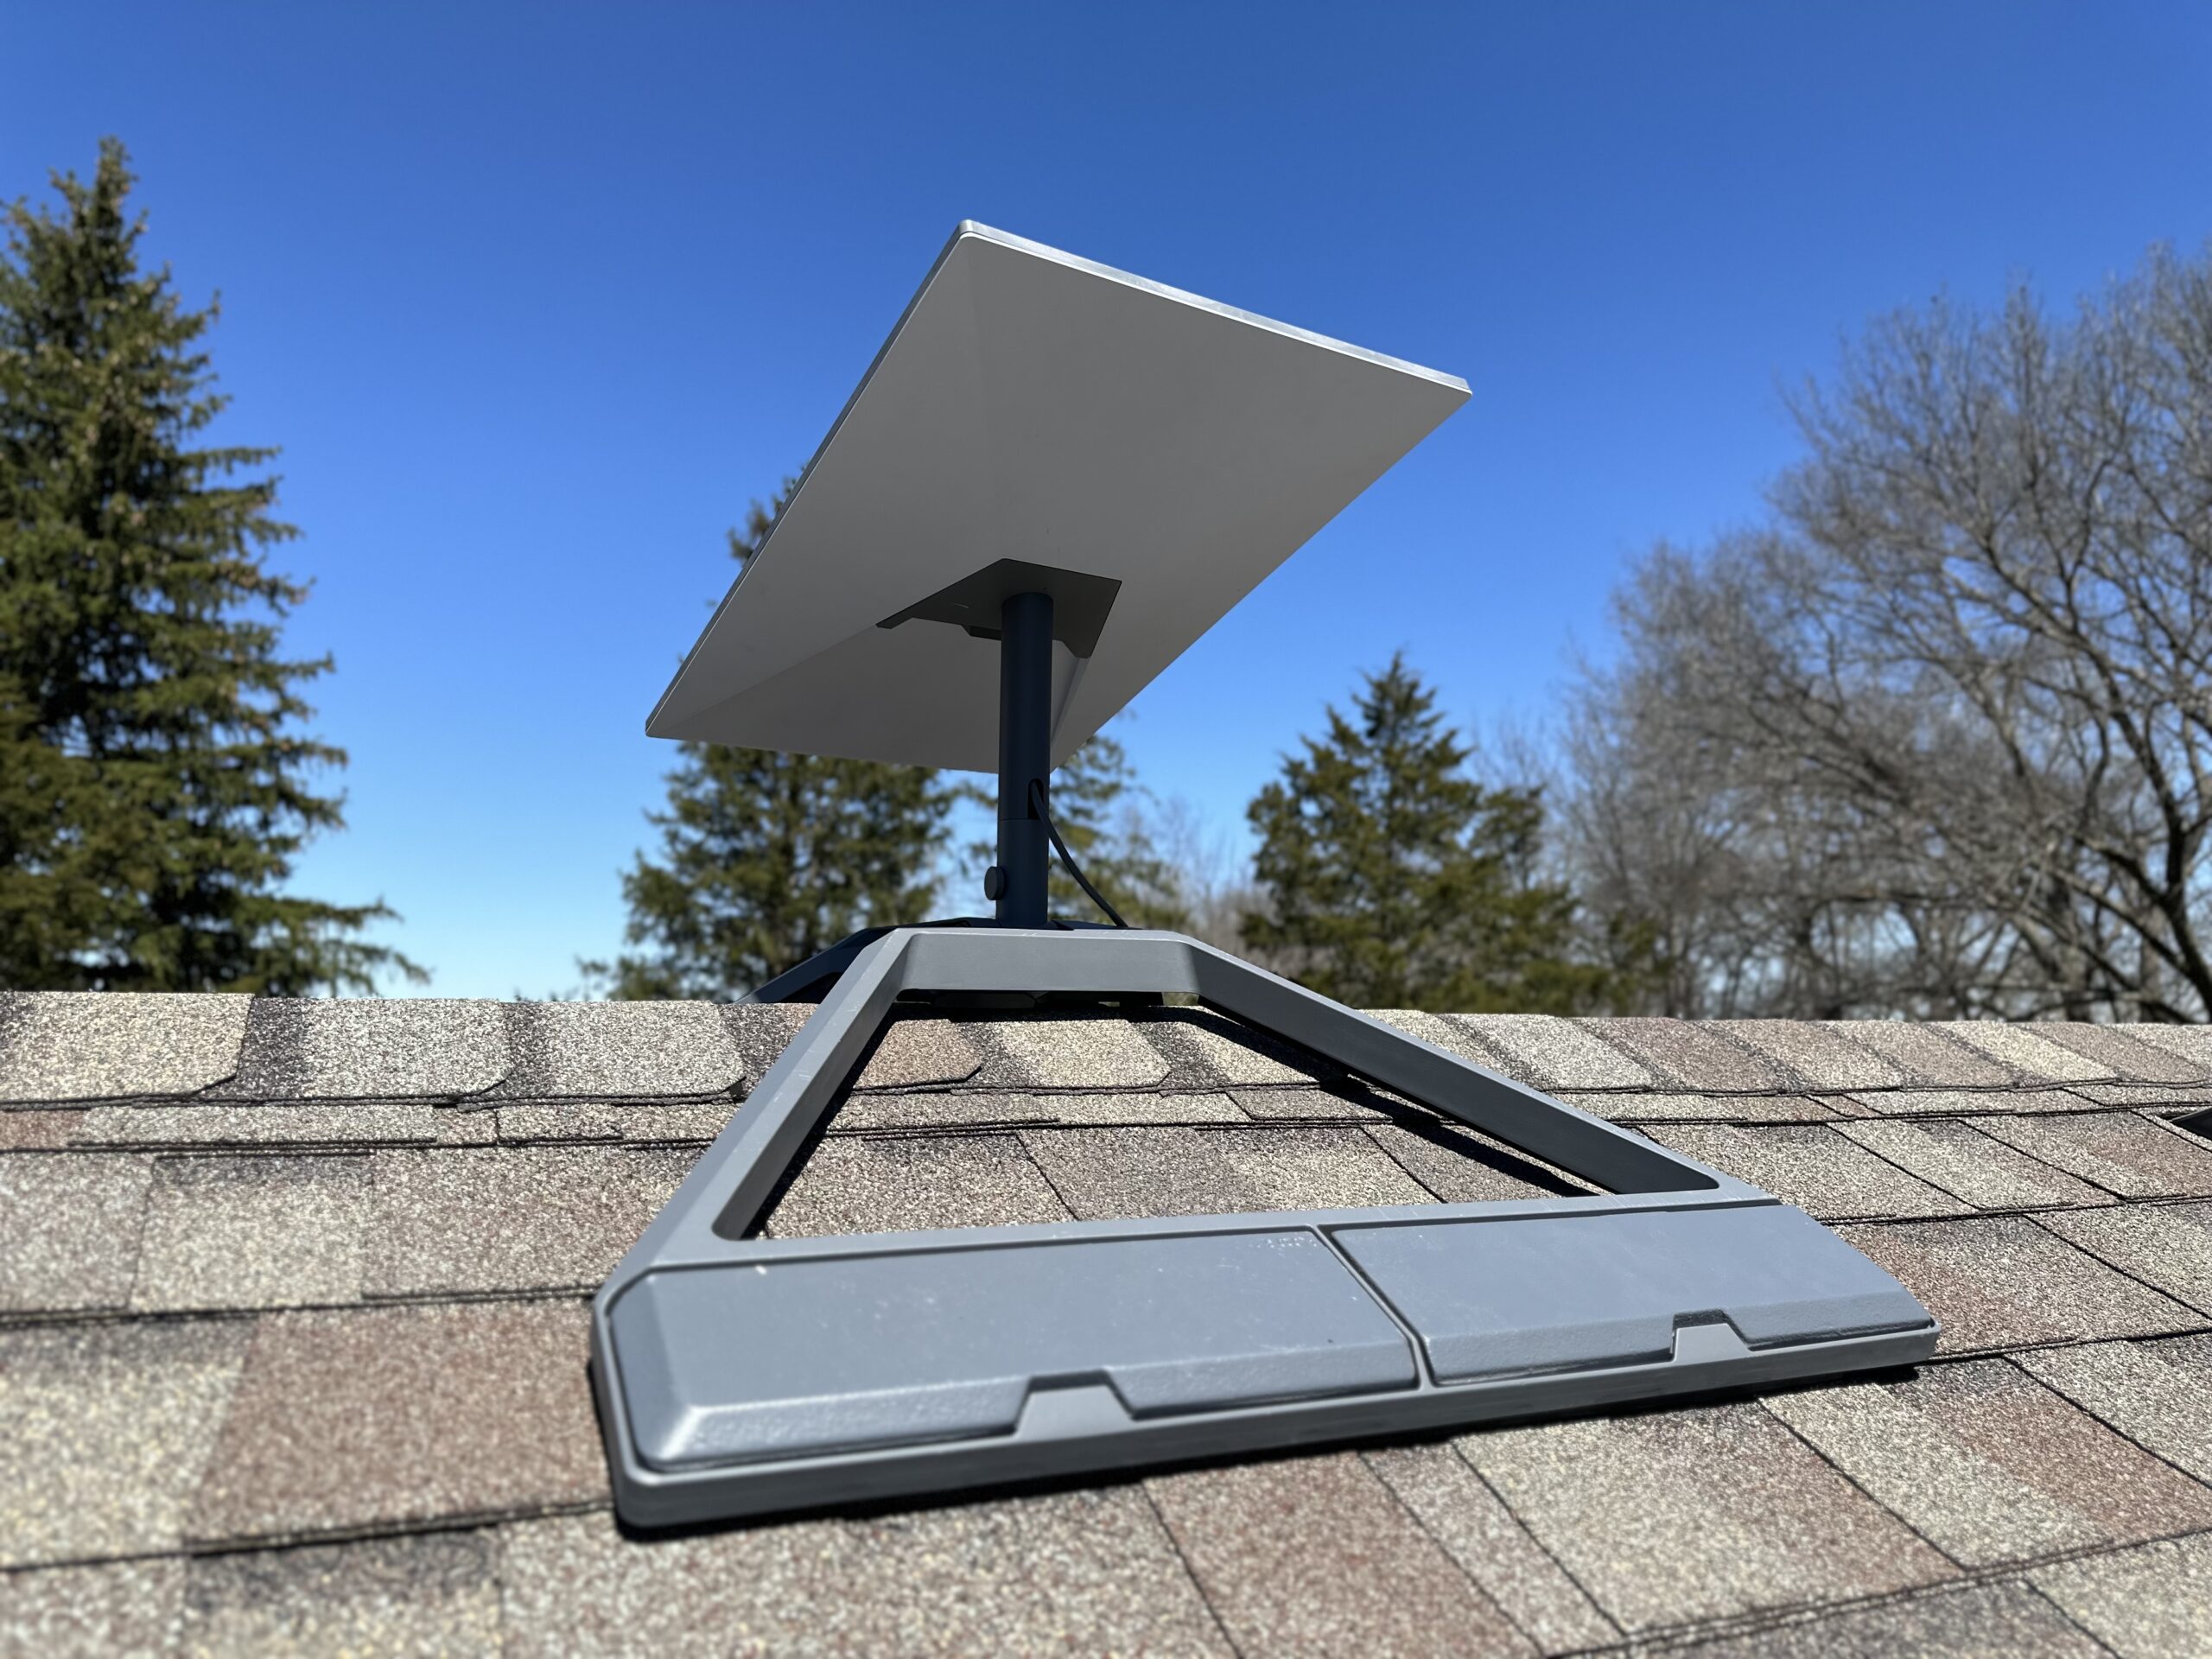
It’s called the “Ridgeline Mount” because it is designed to be installed at the very peak of your roof, known as the ridge. The two legs of the mount are adjustable, and straddle the ridge, creating a stable platform to install the Starlink dish. Since the legs are adjustable to virtually any angle, the Ridgeline Mount can also be used on a flat roof.
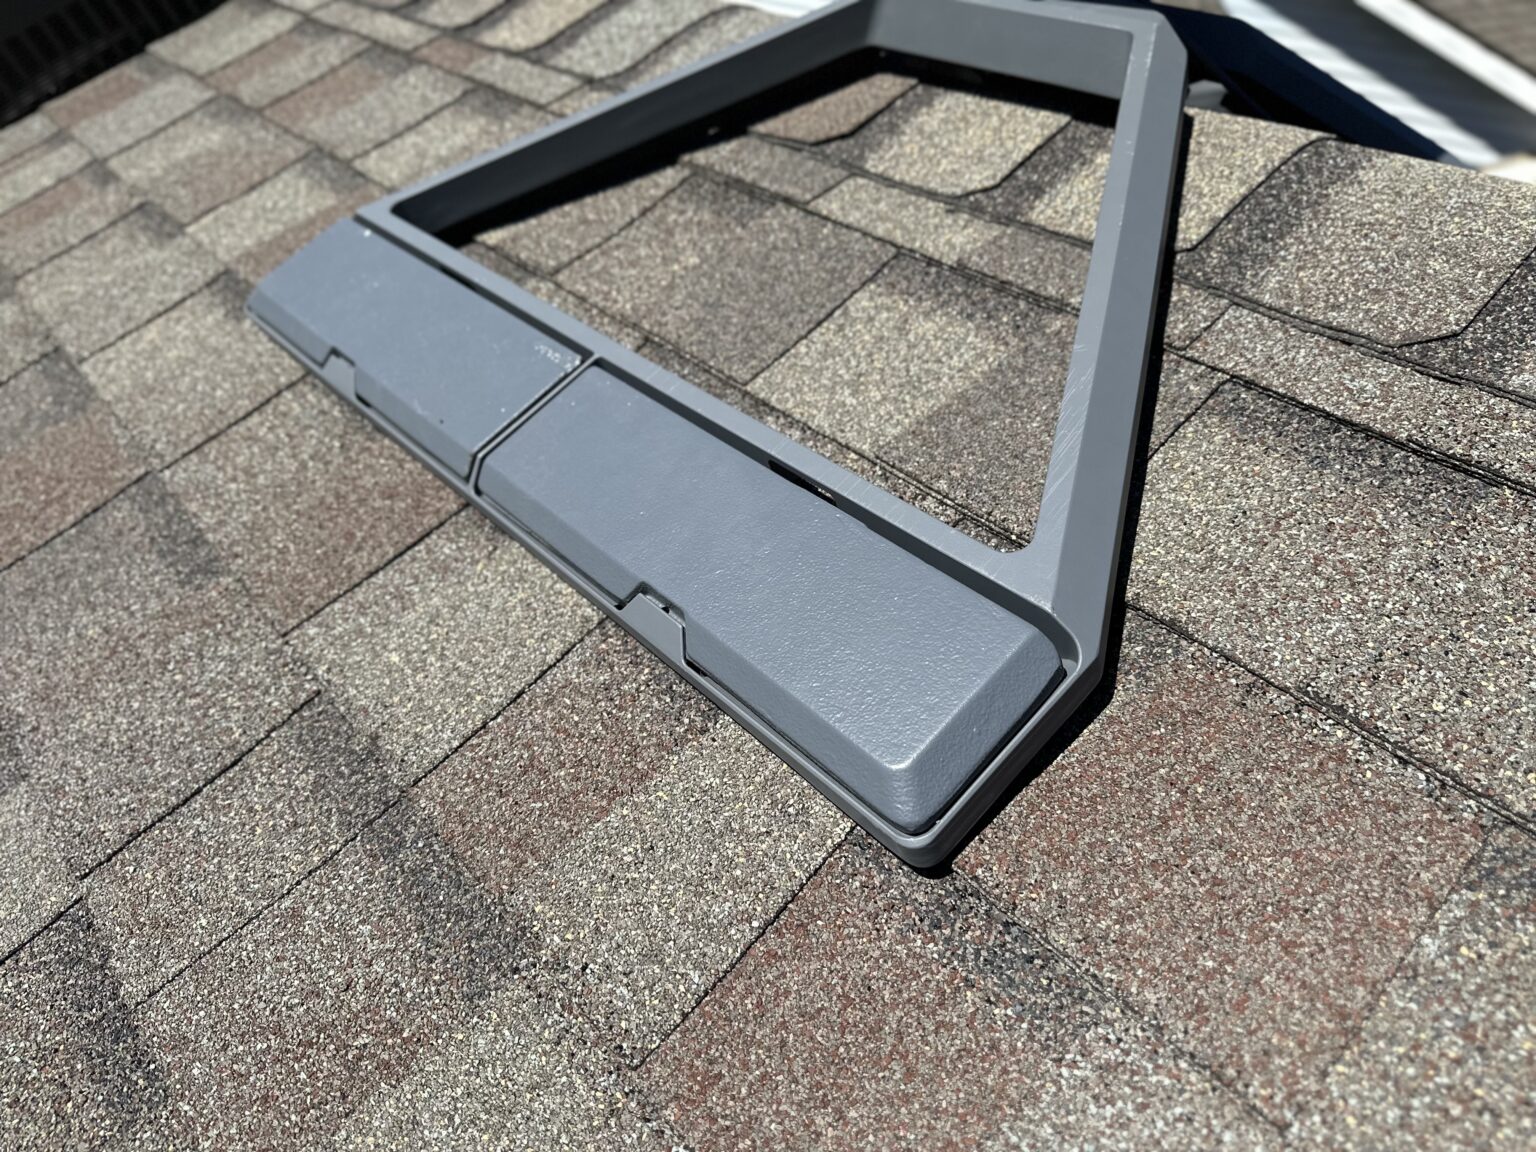
The Ridgeline Mount is compatible with shingle and metal roofs, but isn’t recommended for clay tile. It also isn’t recommended for roofs with ridge vents. The gap created by the vent can prevent the legs of the mount from laying flat against the roof.
The bottom of the legs have rubber strips that protect your roof from the metal mount. They also help the mount stay put on windy days.
Starlink says it can handle 50 mph (80 kph) winds. I’ve had Ridgeline Mount’s installed for years through countless storms, so I can confirm it handles strong winds without any issues. My Ridgeline Mount’s have never moved or required readjustment. The 60+ lbs of weight is plenty to hold down the Standard dish in strong winds.
The Ridgeline Mount Kit includes everything you need to complete the installation. In the box you will find the mount itself, a mast section, an adapter plate for the Gen 3 Standard dish, some cable routing clips, and instructions.
Starlink ships the ballast weights separately. With my order, the mount kit arrived a few days before the ballasts.
Installation
Now that I’ve covered what the Ridgeline Mount is, I’m going to walk you through the installation process. I decided to install the mount on the roof of my detached garage. My garage is pretty typical, with wood construction and a moderate pitch shingle roof. It’s a stereotypical American style roof, but the installation process is just about the same with any type of roof.
Step 1: Assembling the mast
First, I prepared the Gen 3 Standard dish and cable. From the Ridgeline Mount Kit, I joined the dish adapter plate and mast section together. They only connect one way, so it’s impossible to do it wrong. Four plastic tabs lock the pieces together. You can remove the kickstand mount from the Standard dish, you won’t need it with this mount.
Tip: It’s very hard to separate the mast section and adapter plate once you’ve snapped them together! I ended up breaking the tabs when I tried to take them apart. Only lock them together when you are ready to install the mount.

Once the mast and adapter plate were together, I took one end of the Starlink cable and routed it through the small slot at the bottom of the mast piece. I fed the cable up through the mast, and then out the top of the adapter plate. With the cable routed through the mast, I plugged it into the back of the dish.
Then, the adapter plate from the Ridgeline Mount slid into place on the Standard dish. You’ll hear it snap into place as the two plastic tabs engage. I set the dish and cable aside as I prepared the rest of the mount kit.
Step 2: Placing the Ridgeline Mount on the roof
Next, I transported the Ridgeline Mount to the location I wanted to put it on the roof.
Tip: Lock the mount in a closed position and sling it over your shoulder. The shape of the mount allows you to easily carry it like this. By slinging it over my shoulder, I was able to safely climb up the ladder to my roof using two hands.
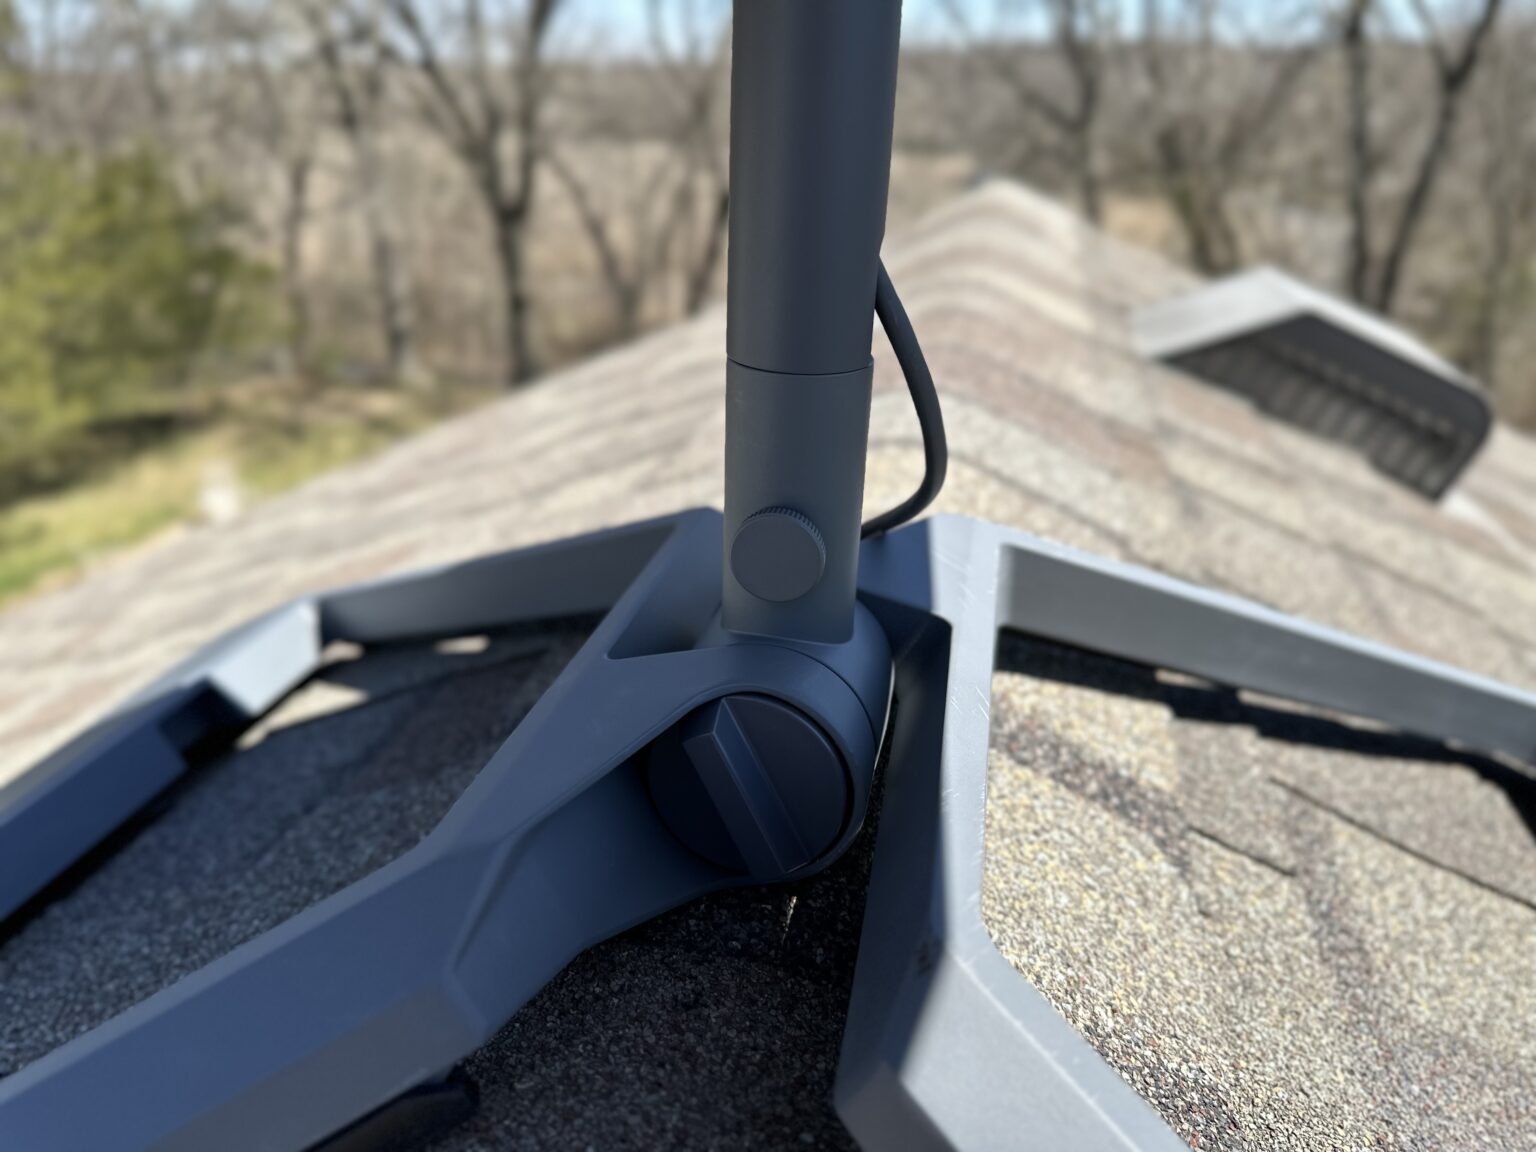
Once I was at the ridge, I loosened the knob on the mount so I could deploy the legs. The idea is to have both legs completely flat against the shingles, with the mount tube pointing straight up on the ridge. When I was happy with how it was positioned, I tightened the knob to lock the legs in place. I double checked that the mount tube that accepts the mast was completely vertical before moving on.

Step 3: Installing the ballasts
With the Ridgeline Mount in place, it’s time for the ballast weights. What I ended up doing is carrying one ballast at a time up the ladder. This seemed like the safest way. I placed each ballast on the roof near the ladder, and then retrieved the next, until they were all up on the roof. Then, I could safely climb up on the roof without having to worry about carrying the weights at the same time.
Now on the roof, I installed each ballast in the holders on the legs of the Ridgeline Mount. There is a beveled edge on each ballast, and that side goes outward, matching the beveling on the mount itself. The ballasts simply drop into place. There is a cutout on the bottom of the ballast holders if you ever need to get them back out.
Tip: The bottom and one of each ballast is beveled to follow the design of the mount. Make sure you have the beveled end facing outward, like in the picture below.
Step 4: Placing Starlink on the mount
At this point I had the Ridgeline Mount installed on the ridge, and the legs tightened down. All four ballasts were in place. Now I could place my Starlink dish (with mast/adapter plate already installed) on the mount.
I carried the dish and cable up the ladder and to the location of the mount. In previous versions of the Ridgeline Mount, Starlink included a nice carrying bag. It made climbing the ladder with the dish a bit easier. With the Gen 3 version, Starlink decided not to include a carrying bag. So just exercise caution when trying to carry the dish up the ladder.
The mast slides down into the Ridgeline Mount post. If it doesn’t slide right in, try loosening the knob. The knob on the side of the mount tube allows you to easily loosen the mast to aim the dish, and tighten it to lock it into position. Once the dish was installed, I didn’t tighten it down just yet. I still needed to manually aim the Gen 3 Standard dish, which I will cover in the next step.
I also took the time to route the Starlink cable down the side of my garage and through the wall to the router inside. If you need help with that, check out my Starlink Cable Routing Tutorial.
Step 5: Aiming the dish
The last step of installing the Ridgeline Mount was to aim the dish. With the Gen 3 Standard dish, there are no motors, so you have to manually rotate the dish according to the Starlink app. The process is pretty simple. I have a Starlink Alignment Tutorial if you want to learn more.
With the knob on the mount post loosened, I opened the Starlink app. If you tap on Alignment in the menu, it brings up a graphic of the dish, and tells you if it’s properly aligned or not. My dish wasn’t aligned, so I just rotated it until the app said it was good. Then I tightened the adjustment knob, and that’s it for installation!

This post may contain affiliate links. See our policy to learn more.
My Review
The Starlink Ridgeline Mount Kit is really easy to install as I’ve demonstrated in this article. It’s a great option if you have a rental home, or just don’t want to risk roof leaks by drilling holes. It’s also extremely versatile, adapting to nearly any roof pitch.
2025 Update: I originally posted this review in 2024, but I’ve come from the future to give you a long term review. The Starlink Ridgeline Mount has held up perfectly over the last year. I’ve had zero issues with the mount moving, even from strong winds. I haven’t had to readjust the angle or anything like that. Zero issues so far. Ok, back to the original article!
There are two main downsides that I can think of. First, the cost. At $300, it costs almost as much as the Starlink kit. That’s a pretty big investment to make, although I would argue it’s cheap insurance against water leaks in the future.
The second downside is if you have a roof with ridge vents. The Ridgeline Mount isn’t going to play nice with ridge vents, especially if they sit up quite a bit higher than the roof. You can probably still make it work, but the legs won’t lay completely flat.
What I Liked
- All in one kit, no additional materials or tools needed
- Sleek, clean design that matches the other Starlink hardware
- Easy to install, easy to move if you need to
- High quality materials and good build quality
- Adjustable for any roof pitch, even flat roofs
What I Didn’t Like
- Pretty expensive at $300
- Not compatible with ridge vents or clay tile roofs
- I wish I had the ability to purchase a mast extension to raise the dish a few feet
- Not available in every market (Amazon alternative)
Final Thoughts
Overall, I can easily recommend the Starlink Ridgeline Mount Kit to anyone seeking a non-penetrating roof mount. It’s a high quality mount that is simple to install. It can adapt to just about any roof shape or angle, even flat roofs. I’ve owned multiple Ridgeline Mount’s from Starlink, and they hold up well over time. I haven’t had any issues with wind, the elements, or quality.
If you have any questions about the Ridgeline Mount, leave me a comment below. I would love to answer any questions or feedback, or even recommend other types of mounts based on your specific needs. To learn about other types of mounts, be sure to read my Starlink Roof Mounting Guide.
Thank you for this information! I like the ridge installation because of not wanting holes in my roof but won’t I still have to put a hole for the cord into my roof or brick?
Looking into Starlink in Northern MN. Wondering if there has been any experience with the ridgeline mount and snow accumulation? 6 – 8 months of potential snow on the roof at various depths. Paranoid about drilling into roof as former satellite internet dish caused massive roof leak.
The dish will do a good job melting snow off the surface and keeping the area around the dish clear. Unless you get a couple of feet of accumulation on the roof, I think the Ridgeline Mount would be a great option.
I have an off grid cabin with low power capability and lots of surrounding trees (obstructions). I bought a mini which I will probably use only there. I can’t use the cabin in the winter (northwoods and unplowed roads) and am concerned about leaving the dish up in that weather, so I would like to be able to unmount it easily for storage. The ridgeline mount seemed a good option, but I can’t find one for a mini. Can the gen3 mount be easily adjusted to fit the mini? Are you aware of any other options? Thanks in advance for your help.
Your situation may be better suited to a full size antenna.
The mini will be much more sensitive to obstructions. You can rig something from the hardware store and make it work… But the full-size StarLink Antenna is the likely the way to go if you are putting it on the roof… Look into the Ridge Mount so it does not need to be screwed in (nice for many reasons) which lets you take it down without tools and be on the way.
Just bought the Gen3. Can a Gen3 be mounted on the Gen2 weighted ridge line roof mount? How would I retrofit for this installation or can parts be purchased?
Yes, Starlink actually just came out with the Gen 2 to Gen 3 adapter for this situation. With the adapter you’ll be able to use Gen 3 on the Gen 2 Ridgeline Mount: https://shop.starlink.com/products/us-consumer-adapter-mount-gen3
Do they still offer this option? I couldn’t find it when I looked Sept 24? This would be so much better mounting option for me than the pivot mount. Thanks.
What is the wind rating on the Gen 3 Ridgeline Mount? In my area, wind gusts can get up to 65-70 mph. I was debating on setting the dish on a pole in ground but learned about the Ridgeline Mount. I don’t care to get up on roof & take this down if is unable to withstand high winds.
They don’t assign a rating but I believe they’ve said just about all mounts can easily handle up to 50-60 mph wind. Getting up to 70 mph I would be sightly worried, but I honestly don’t believe anything would happen. The mount itself would not move at all. It’s the connection between the dish and the mounting plate adapter that I would be worried about snapping. With Gen 3, it wouldn’t really matter which mount you go with because they all use that same mounting plate adapter to snap into the dish.
I previously ordered the Ridgeline Mount for my Gen3 Starlink and separately ordered a Pipe Adapter kit but no mast came with it or, was available for it at that time. Is the mast now an option that can be purchased or should it have come with the Ridgeline Mount or the Pipe Adapter kit? I shave yet to install my Ridgeline mount on my roof because it doesn’t have a mast to make it work
I recommend returning the Gen 2 Ridgeline Mount and Pipe Adapter, and then ordering the Gen 3 version of the Ridgeline Mount. Gen 3 compatible mounts will come with the mast section you need. The Pipe Adapter is the exception, since it’s designed to be installed on a 3rd party mast.